Search This Blog

Showing posts with label baking. Show all posts

Sunday, 12 April 2020

Hot Covid-19 Buns


 So it’s April 2020 and the world has been in the grips of the Covid-19 pandemic for about a month now. Lots of people are working from home, we’re all practicing Social Distancing and the interwebs are flooded with ideas on how to keep yourself busy while in isolation. Baking and cooking (not surprisingly) are quite high on the list. Not only does it mean you can stay at home for things you would go out for, but I know of several people who are using this time to perfect their sourdough bread technique, or make chicken stock from scratch.
 I however, work in an Essential Services Job. Which is great as it means my employment and income are (luckily) fairly insulated from The Crisis, but it also means I have about as much free time as I usually would; less even, as my non-working hours now need to fit in Skype or Zoom chats with family and friends. Hence, not a lot of “iso goals” being achieved by me at the moment.
 But it is also Easter, which for me means Four Days Off. Yes, I will be stuck at home (probably being REALLY boring and doing some once-a-year cleaning jobs), but I have decided to Seize the Day and to make Hot Cross Buns on Good Friday.
I have written previously before about my technique for the HC Buns, but it has been a few years since I have made a batch. They always taste great straight out of the oven, but by the next day can be a bit chewy and are only good for toasting. This is not a problem when you take a batch to An Event but it is tricky when you’re trying to eat your way through a dozen by yourself.
 But Good Food did have a Top bakers' tips, tricks and riffs on hot cross buns (https://www.goodfood.com.au/recipes/news/top-bakers-tips-tricks-and-riffs-on-hot-cross-buns-20200405-h1n67b.html) which I scrutinized carefully and have found several variation which I’m going to try.

1. Use Bread Flour. I will admit I was going to do this anyway (and it had nothing to do with having a random 200-ish grams hanging around in my cupboard). Hopefully this will give the dough a bit more stretch and a bit more “life”
2. Pre-soak the fruit. This kind of makes sense; if the fruit is “rehydrated” before it gets baked, it will pull less moisture from the bun mix, leaving more IN said bun mix to keep it “fresher”. I do have a whiskey chocolate cake recipe where the raisins are soaked in whiskey before you add them to the mix; maybe I can make an adults boozy HC Bun batch one year!
3. Add fruit after the kneading. I haven’t had too much of an issue with my fruit becoming squashed, but why not? I will knead the dough appropriately and then add the fruit in just before the first rise
4. Add dates. Again – totally nothing to do with having dates in my cupboard! This will make up for the lack of sultanas (of which I had none in my cupboard), plus who doesn’t love dates in pudding?
5. Spray buns before putting them into the oven. The theory is that “it moistens the skin of the bun, allowing them to rise more in the oven leading for a fluffier bun”. Which is The Goal after all
6. Use apricot jam as the glaze – this WILL be dependent upon whether I still have a small jar of it in the fridge! There were lots of variations on glazes in the Good Food article, but I do remember using strained apricot jam when I made a sachertorte (I don’t think I blogged about that one….very fiddly but ultimately deliciously chocolatey).
I also remembered that I have a dough hook with my Kitchen Aid so decided to use that instead of hand kneading or using my hand-held mixer.

And how did I go??

1.  It worked out hat I had exactly enough Strong Flour (OK, it was pasta flour not bread flour but I know they both have more protein) to make a half-half with plain flour. So that was nice to empty out a container!
2. The fruit did look a lot plumper. However, it was difficult to strain all of the water out, which meant there was a bit more moisture going in to the mix, which made it quite sticky. Not the end of the world but it did get stuck to my hands A LOT, and they didn’t look as pretty and rounded as the should (more knobbly and “rustic” looking); I sort of had to spoon them into the tray rather than rolling them into nice balls. Extra water also made it tricky for step 3, as the fruit didn’t want to mix into the dough. Perhaps for next time I will knead the dough for the allotted time then tip it out and hand knead the fruit in (or leave it to drain for longer before adding it)
4. The dates weren’t a noticeable difference, again the main difference with mine versus shop bought is the presence of mixed peel – it really changes the flavour. As it is the same bag of peel I have been using for probably 10 years or so I possibly will not buy another bag when this one runs out; just mixed fruit is fine.
5. I did spray them, but I didn’t really notice much difference in the fluffiness
6.  No apricot jam in the fridge so stuck with golden syrup for the glaze. Perhaps I will switch to apricot jam when I finish the bag of mixed peel – swap one orange thing for another!

Knobbly rustic buns before going in the oven

The buns straight of the oven tasted wonderful – very soft and light. By afternoon tea time, they were a bit more solid but still easy to butter and slice. But again by the next day they had dried out a bit further and thus got toasted for breakfast. So luckily I only made a half batch and that I’m home for a few days to eat them!


Piping hot just waiting for butter

 So some hits and misses with these tweaks – I think I’ll keep the Kitchen Aid, and the fruit soaking. I may try and track down actual bread flour for the next batch, but again – best to plan to eat them on the day.

Happy Easter!

In other baking news, whether it’s bravery or folly, I am going to try and make yo yos this afternoon from my grandmother’s recipe (so its fair to say they will probably not be as good as hers; she’s been baking them for 70+ years!

Thursday, 3 May 2018

An Ode to What's Left


 I was made aware of a strange Human the other day – a man who doesn’t do Leftovers.
 Now I’m not talking won't-eat-3-day-old-dinner-because-germs-phobia leftovers, I’m talking about a will-throw-out-any-food-not-consumed; will-make-every-meal-from-scratch type of human. He even goes to a supermarket EACH DAY to buy something fresh for his lunch (say, a chicken breast and some veges) and will then cook it up and eat it for lunch. Every. Day. He apparently had to be almost pressured into eating food left from Christmas lunch for dinner that night (isn’t that the point of Christmas night dinner?). Though apparently eating a cake or biscuit The Day After is OK (phew!). Apparently it’s by-product of growing up with a father who ran a restaurant – he always had a meal made from scratch every night (nice for some)

This blew my mind. On SO MANY levels. So much so that I had to blog about it.

  Leftovers. For a word that sounds so second rate, in cooking it is a magical thing. I have already blogged about how awesome they can be (see here for a refresher). They’re like a little magical gift from your fridge, “I know you don’t feel much like cooking tonight, so here’s a meal you prepared earlier! Or some bits and pieces that (when combined) will make a really easy dinner!”.
 There are certain dishes that I love making because I know the recipe will make too much.
 Like my Speedy Tuna Pasta (that is the actual recipe name, not my iteration. Though it is super quick to make. This is why we love it). Or the risotto we had for dinner last night that I made for Saturday night’s dinner, knowing that it made enough for another dinner (We've got a school Bake Sale this weekend – I needed kitchen time for cookies and cakes not meat-and-three-veg). And when Husband makes a roast dinner (which, luckily for me, is fairly often during the cooler months), he deliberately buys too much meat and cooks too many veges. Which means we can have several meals out of one lot of cooking, as well as roast pork for yummy rolls for lunch.
(and on that – who doesn’t make their lunch the night before? You really should. We stumbled across this wonderful life hack back in the Before Kids days, as it meant an extra 10 minutes in bed in the morning. It also alleviates the “argh! We don’t have any bread” school morning chaos, as you’ve already discovered this anomaly the night before. Clever. And yes, even salad sandwiches are OK made the night before and stored in the fridge, as long as you have a barrier (such as cheese, spinach or avocado) between the tomato/cucumber and bread #learningstuff)
 Speaking of lunch, here is another point for Leftovers – the cost. Any financial planner worth his (Himalayan pink) salt will tell you one of the best ways to save money is to bring your lunch from home. When two sushi rolls or a lame sandwich and a drink from the cafĂ© leave you with little change from $10, you know you’re on a good thing when you can make a week of lunches for the same prices. Not to boast but I can’t remember the last time I had to buy lunch for work. Most of this is due to a fantastic house husband who keeps me in rolls and salads, but I also have a stash of vege slice in the freezer for those Cant Be Bothered Days- like today!

Hmmm. Their freezer must be really neat and tidy without all the leftover meals sitting there. He’s also averse to frozen meat. Crazy.

 But back to dinners. We all have those dishes that taste better after a night in the fridge – gumbo, stroganoff, lasagna. But how would we know if they were thrown in the bin?
 And that’s another thing that really gets in my 21st century craw – the Food Waste.
 Having a husband who works in fresh produce, we see how much food doesn’t even make it to be sold to the consumer (which is bad enough). But then to Throw Out anything unconsumed just leaves me aghast – all of the resources that went into creating that nourishing food, going to landfill.
 In our house, leftovers go in the fridge/freezer to be used again. Anything that’s not enough to make a meal or snack gets divided up between the chickens and the dog. And most other food waste goes in the compost bin, leaving only onion skins and citrus that actually makes it into the landfill bin.

 I could preach on and on about this, but as my packaging waste levels leave a bit to be desired,  I’ll get off my soapbox now. But one final thought – if we didn’t have leftovers, think of all the wonderful recipes that would never have been invented:  bread and butter pudding and pangrattato (using up stale bread), Shepherd’s Pie and Bubble and Squeak (using left over meat and veges), aracini (from "left over" risotto. I’ve heard such a thing exists – just not in my house!)
Granted you can makes these recipes using “fresh” ingredients (not leftovers), but where’s the fun in that? And I bet they wouldn't taste as good either.

 So in these days of Food Miles and Less Waste, I’d like to again champion those who do their best to make sure No Food gets left behind. We get creative and clever, and sometimes it's probably not a Meal as much as a Collection of Food objects, but we’re helping the planet (and our purse strings) just that little bit more.


In other Domestic Goddess news – I got a Kitchen Aid.
 A second hand one from a friend but still – it’s black and its beautiful. I took it for a spin yesterday and it made my cookies in less time, and made my chocolate cake so light and fluffy that it rose over the middle of the doughnut tin! Who knew how much quicker things would be when you don’t have to stand there and hold the mixer!
 I also got super enthused and cooked a cake for afternoon tea. I have NEVER done this before. But when your Son smells the cake you are making (for the bake sale) and raves about how great it smells, it does inspire you to make one for him. And serve it straight from the oven with butter melting into it – yum!
(Well I had to have one picture!) Honey Loaf with butter


Sunday, 17 January 2016

Ain’t no party like a Star Wars party (Episode I)

(Wow – it HAS been a long time between blogs – apologies. Full time work (plus a study course for a few months) AND an awesome hubby who cooks most of my meals, doesn’t leave much time to blog and space for inspiration! But stay tuned, ".....there is another")

 I’m always a fan of a themed party; whether its Yule (see here and here), Christmas, or age appropriate birthday themes. Thus, I always have sleepless nights get excited when I have a kids birthday party coming up. Son 2’s birthday was in October, so I started dropping hints early September about what type of theme he would like (It's always a delicate dance between what HE wants and what I think I can work with). His first suggestion was Jurassic World, which had me envisioning lots of fossil and dinosaur related treats (which I had seen around the Interweb). Not a bad start, BUT with the new Star Wars movie (Episode VII:The Force Awakens) coming out a few months later (and us being a house of huge Star Wars fans), I easily steered him in that direction.
 We have always been fans of Star Wars. Husband and I have had several occasions where we watched the original trilogy back to back (one time with special blue colored milk). We went and saw all of the remastered movies when they came out, as well as all of the prequels on opening night. We have shelves of books, boxes of toys, cups and plates,  and even had a large film poster dominating our lounge room for many years. With the newer cartoons of the last few years, I had done a previous Star Wars:The Clone Wars party for Son 1.  We had that party in a park, which did impact on my creativity as I had to be able to transport everything there and back. I was able to have a few Star Wars touches (like lightsaber breadsticks, and we made Stormtrooper masks), but not the whole shebang like I would have with a party at home.

 Now was my chance.

 As with most themed parties I throw, it becomes more about what I DON'T end up making than what I do. With Pintrest and many many Star Wars fans on the internet, there are A LOT of party ideas around! After my Minecraft party (....which I didn't actually blog about), Son 2 liked the idea of cool food labels, so it was also what I could get a good pun name for. 
I did see some great labels online, but some of them made NO sense....


 Han Burgers?? **
  
 No – much more sensible to do Han SOLO! And his friend, Luke Sky-Water!

Printed labels to the rescue

 (In their defense, Americans don’t have Solo as a drink. Hooray for us)

 I did my breadstick lightsabers again - small pieces of aluminium foil wrapped around grissini-style breadsticks. (I even still had the on-off switch colored stickers I had used from Son 1’s party; I kept them “just in case”. Because that's what I do).


   We also had A.T-C.H.I.P.S and Death Star Bites – not very pun-worthy but it was then best I could come up with for potato chips and cheezels (two party staples)!


 Another party staple is fairy bread, which has made it into several parties by way of cookie cutters to cut the bread. Luckily for me, my brother (who lives in Canada) had sent me some Star Wars sandwich cutters (as well as some pancake moulds – if only I could have incorporated them!).
 So that made it easy to have Galaxy bread (as in “… a galaxy far, far away).


TIE fighters on the left, Millennium Falcons on the right 

 For hot food, we had mini Hutt Dogs (straight from Pintrest) and X-wing bites. 


 The X-Wing bites came from trying to think of something to do with chicken nuggets (One of Son 2's favorite foods)! I ended up using chicken fingers (rather than nuggets), and joining them in an X-shape with toothpicks: very low tech but very well received.

 I also made a batch of Wookie cookies (thanks to Ro for the idea). I used a slightly different recipe (its quite tricky to find "tofffee bits"); the Neiman-Marcus oatmeal cookie recipe (I didn't blend the oats to give them more of a textured look). I also attempted to make elongated cookies (more Chewbacca-esque shape) than Ro's round ones; but as you can see, they did that anyway as I didn't space them our enough on the tray (seriously, I was not going to dirty another tray for ONE cookie!). The most misshapen ones were the "quality control" cookies.


Looking more like Adipose from Doctor Who rather than a warrior from Kashyyyk. But still yum.

I also did a a variation on the s’mores that I had been making.
 I had seen a few variations on TIE fighter snacks on Pintrest – usually with cheese biscuits and a piece of cheese in between


Thankyou random Star Wars fan

But by this stage of planning I needed a few more sweet things, so decided to make my own s’mores TIE cookies!   A batch of chocolate cookies cut in a hexagon (very hard to find a hexagonal cookie cutter!), with a marshmallow in-between, held in place by melted chocolate. Yum!


Again with the too-closely spaced cookies! You'd think I'd have learnt....

TIE assembly line: cookies, chocolate, marshmallow, chocolate, cookie

 If I was making them again, I would make the biscuits a bit smaller, like this...
Thankyou other random Star Wars Fan
 (wait, is that peanut butter they've used to stick them together?? Yum!!!)
 I was trying to do them to scale (yes, I did get out a TIE fighter toy and measure it. Beacause that's what I do), but they ended up being about 7cm long which made them quite ungainly to stick together and store. Delicious, just awkward, and the cookie-to-marhsmallow ratio was all wrong.)

  And to offset all that sugar, I also made FruiTIE fighters as well – (smaller) hexagons of melon with a grape or strawberry in between.


 AND in the just-because-its-cool category, I had marshmallow Storm trooper helmets. This one mainly came about because I had been suckered into buying a bag of Jumbo marshmallows from Costco. Which look great, but are quite difficult to toast over a fire, so I still had ¾ of a bag-full! This was fun as I could use the helmet design for the newest trooper from “The Force Awakens” as well as Clone Troopers. The trick with this was tracking down a black food pen, as well as drawing precisely on a spongy surface!


Not terribly drawn, just not super well drawn.
In easy Grab-and-Eat appropriately themed cups.

 And you can’t just eat at a party, you need activities (especially with boys!!). Husband has amassed quite a collection of Star Wars figures over the years, so they got pulled out. And being 7 year old boys, I knew that if I could incorporate shooting things, it would be a bigger hit. So I set up a Star Wars shooting gallery – Nerf guns aimed at different size figurines. We found that Jabba the Hutt was quite difficult to knock over due to his wide base. As was the super sized Qui Gon Jinn.

 Sticking with the idea of Use What You Have , I also organized Trooper Bowling (another Pintrest idea) – I printed out a few Stormtrooper masks and stuck them to the pins on our bowling set. The we could roll our “Death Star” bowling ball to it and see how many troopers got knocked over (and for the Fans out there – yes, I know the Stormtroopers were on the same side as the Death Star, but it worked better that way!).


Definitely too short to be Stormtroopers

 And finally some combat practice. A popular Star Wars party idea was to make your own lightsabers; some parties even made this as an activity. I knew from previous years that the kids didn’t want to MAKE things so much as PLAY with them, so I pre-made these. Super complicated: Step one – purchase pool noodle from shop (in appropriate colours – I had blue and green as I didn’t want any red Dark Side sabers). Step 2 – cut pool noodle in half to make a suitable blade for 7-year-olds. Step 3 – sticky tape “Lightsaber hilts” (printed out from the internet) around the base and voila!
Looks effective, super easy. My favorite
 But make sure to set some rules before you unleash them on each other, or it would be chaos (ours were No Hitting on the Head and only Two people fighting each other at a time).


Working up an appetite AND burning off sugar
 Last but not least, we had the cake. If I had the time I would have made something awesome like this  or even this!!! (I would have loved making the X-wing and TIE Fighters. The oodles and oodles of Death Star building bits not so much). But as I had the kids party as well as a family party in three days I decided to be sensible and go the cake topper route.
Family Party cake

Kids party Cake. Two toppers = better value postage

 Perfect.

 The kids had a ball, the food was a hit and all went home happy.

 The Force was indeed with us.


** I did eventually get this - it was a pun worthy twist on HAMburgers.....

Sunday, 4 January 2015

Christmas Catch Up

 So we've taken down the decorations and recovered from celebrating the New Year; it seems like a goods time to look back on my Christmas culinary adventures for 2014.

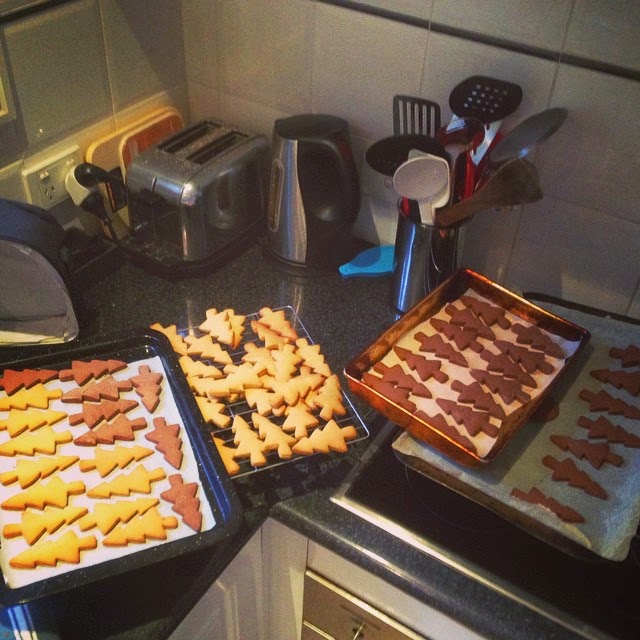
 As regular readers would know, this year I made gingerbread trees to give out to friends/family/work colleagues/school teachers/comic book shop guys/the school crossing man. So I ended up making a LOT of gingerbread. Each batch made 64 Christmas tress, and I made 3 batches. That is a lot of mixing, rolling, cutting, baking, piping and bagging. Suffice to say, I don’t want to even think about gingerbread for a few months! Ironically I actually got to taste my first Christmas gingerbread at the weekend (the last two trees left over from Christmas day) and they still tasted good, almost two weeks after baking!
 One thing I did different this year was an attempt at Gluten Free (GF) gingerbread. With a friend who is coeliac and several gluten intolerant friends, I felt bad that they couldn't share in the spoils of my baking. Luckily, the only ingredient that contains gluten in my gingerbread recipe is plain flour (it uses bicarb soda as a raising agent), so I thought it was be a fairly easy substitution. I had some GF self-raising flour in the cupboard from a previous GF baking session which I usually wouldn’t substitute for plain flour. However, using my Science Brain, I remembered that it was the gluten in the flour that bound the baking together and helped it raise, so GF self raising flour was probably closer to non-GF plain flour than non-GF SR flour. All clear??
 And it worked quite well. I went more on Feel than exact measurements when adding the flour; GF flour has a rather different texture to non-GF so I probably had to add more to made the dough sticky enough to roll out. And I think the GF SR flour did make a difference, in that they were a bit more rounded, a bit softer, less crispy-biscuit like (next time I'll buy GF plain flour). But the main thing is they still tasted (and looked) like gingerbread, and my GF friends were very appreciative, even though I didn't get a chance to ice them.

(the darker ones were chocolate gingerbread)
 My next step is to try and make a refined-sugar free gingerbread (have I mentioned that a lot of my friends are very health/diet conscious with a lot of “…. Intolerant” kids???). I figure that I can substitute coconut sugar for brown sugar, and maple syrup for the golden syrup. This will probably affect the consistency and “stickiness” of the dough, so will probably mean a bit of fiddling with the (GF or not) flour. Next challenge will be going dairy free – should be a straight swap with nuttelex for butter which would hopefully cream up well with the sugar. I thought I had almost got everything sorted to finally make a batch for one of my friends (who is gluten, dairy, soy and refined sugar free), who then informed me that she doesn’t eat refined oils, which nuttelex is. *sigh*  My other option is then trying to cream coconut oil and coconut sugar together (and hope that it holds together), mix it with maple syrup and GF flour, and hopefully the addition of ginger will make it still taste vaguely like gingerbread.
 (Or maybe I can just resign myself to not making her gingerbread!)


 Regular readers will also know that I love a good theme, and Christmas is a great excuse to get Creative with Cooking. Last year it was my Rudolph pancakes, which this, year when I made them in early December, Son 2 proclaimed that he wasn't much of a fan of because he doesn't like bacon (Son 2 LOVES bacon, so he didn't see the issue). Nerdy Nummies Ro had made some Snowman pancakes (its the third 'treat') but that wasn't really suitable for an Australian Summer Christmas (but will be great if we go to the snow!). I then came across this awesome blog called The Joys of Boys (they had blog on making Star Wars snowflakes. So cool). They had Santa pancakes, which apart from having a HEAP of whipped cream (which I would think would be that nasty stuff from a can – what is it with Americans and a tonne of fake whipped cream?!?), they also had cherries for the hat. I have a girlfriend whose kids would adore this version (their dad was raised on a cherry farm and they are massive Fresh Fruit Fans), but mine, not so much. So what to use? Coincidentally at this time, one of my girlfriends (She with the French husband) was getting ready to go the Paris to celebrate Christmas with the Hubby’s family. For 5 weeks. And so was clearing out her freezer. As well as a packet of breadcrumbs (which my chickens loved) she also gave me a bag of 5 frozen eggs whites; which were leftover from an awesome chocolate Crème Brulee she had made the last time I went for dinner. Hmmmm – how fortuitous! So on Boxing day (as Christmas morning breakfast was taken up with the traditional croissants and fresh fruit breakfast), I made these Santa Pancakes...


...bacon for the hat, an egg-white omelette (badly) cut into shape for the beard and hat trimming, blueberry eyes and a strawberry nose. I got big smiles from both Sons who then carefully removed the fruit, swapped the bacon for egg and happily devoured them!

 My last piece of Christmas faffing was something that had been hovering around my Christmas Pintrest board for a while – the Christmas fruit tree. There are lots of really cool variations (when you have a spare 5 minutes, type “Christmas fruit tree” in the search engine and check them out). I did like the 3D version, but it didn't seem to be able to support a lot of fruit and as I was doing this for our family Christmas lunch of about 15 adults, I wanted to make sure there was bit available. Plus I knew I would be assembling it after I had hosted breakfast but before jumping in the car to drive to lunch. So it trying to keep things less stressed on Dec 25th, I settled for the 2D version. I had no grand plans as to how it would look (how very unlike me! I must have had my brain filled with other Christmas Organising), but ended up using cantaloupe (or rockmelon depending on where you were born) as “boughs”. Small bunches of grapes were great for greenery, strawberries and blueberries for a touch of colour and some watermelon star cutouts to make it look Christmassy.


 So I hope you all had a fun and festive Christmas with lots of yummy food (as I did) and I look forward to doing it all again in 11 months time

(but maybe not gingerbread this time…..)

Monday, 15 December 2014

Hot Chocolate

 I do love it when you work out a solution to a problem – especially when it doesn't involve paying someone/buying something/spending hours searching on the internet. It can be as simple as a system for taking washing off the line (Things that needs a hot iron off first so they are at the bottom of the basket and will be ironed last when the iron is the hottest), or for keeping you Tupperware drawer tidy (lids all in one spot people!). Thankfully this was a bit more of an interesting problem to solve – how to keep melted chocolate, well… melted.

 After my recent fondant fetish (click here and here and here!), I had started experimenting with melted chocolate as a decorating tool. It started with plans for Son 2’s Minecraft birthday party, which involved making black shapes for Creeper faces.
This is a Creeper. It explodes if you get too close. Just so you know
 While I was wandering the cake supplies shop, I noticed that black chocolate melts were much cheaper per kg than the black fondant. Interesting. PLUS chocolate could be piped in fine lines for smaller creeper faces (which I was planning to put on green rice krispie squares for taking to school) , where as it would be annoying to cut out very small slivers of fondant. AND it always looked so easy when my You Tube bloggers used it – what could possibly go wrong?

 Well.

 Melted chocolate assumes a liquid form. And the hotter it is, the more liquid it becomes, to the point of it oozing and not making pretty straight lines like you are supposed to. Not good when you are a perfectionist bordering on–OCD.

Not my finest work. They either look possessed, evil or stupid (still tasted yum though).
 Melted chocolate also has a tendency to set when it cools. And this doesn't always happen once it is piped out, it can also happen while it sits in your piping bag. Which leads to lumps of semi solid chocolate blocking up your piping nozzle, and it coming out unevenly. Which leads to much Fiddling and Fixing and Touch Ups and Swearing and Stress.

Like a Monet - good from a distance but a mess up close
 At first I thought it was just the colored chocolate, as it took quite a while to melt and didn't really mix together very well. But when I had the same problem using good ol’ Cadbury that I realised it was a Chocolate Issue.

My Groot Sundaes: more "messy" than "gnarled tree" appearance
(click here for what they were supposed to look like)
 So what to do?? I could use royal icing for all of my future decorating. It pipes nicely, colours well and you can keep it in the fridge between times.

(and a little goes a long way)
 But it doesn't taste as nice. And it’s not chocolate.

 So a solution had to be found. Especially with my plans to make gingerbread trees for my Christmas gifts this year.

LOTS of gingerbread trees!  (this was batch 1 of 3)
 At first I tried microwaving the chocolate intermittently, which worked well. I found I could ice and decorate four trees before it needed a minute in the microwave. But I had to unscrew the metal piping tip and scrape out the solidified chocolate each time. Annoying. And stop piping. More annoying.

 I did think about some sort of hot water bath to put the piping bag in, but I have found the no matter how carefully you seal the bag up or pop it in several plastic bags, water still gets in and ruins your chocolate. Not helpful

 There are cool cups (as in Cold, rather than Clever and Awesome) that you can put in the freezer to keep your drinks cool over summer, I just needed a Hot version .

 So I made one myself! Pour boiling water in a large cup, place a smaller cup inside and voila!

 (I shall add a picture here when I take one at this weekend's piping session)

Pop your piping bag in it in between sprinkled sanding sugar or carefully placing cachoos and you are ready to for your next set of trees. So simple, so cheap, so effective, so clever (well, I think so).
Oh! Christmas tree (s)
 So I hope that this has helped you to keep your chocolate hot and your piping pretty.

In other Kitchen News, I received a kitchen blowtorch at the weekend, so look forward to a creme brulee post in the future (which will hopefully not be entitled “What can go wrong with a Kitchen Blowtorch" or "Effective Ways to put out a Kitchen Fire")


Tuesday, 25 February 2014

Baking it 'til you Make it

 My Hubby jokes that every time I try a new recipe, I always miss one (or three) ingredients. This can be due to the "I'm sure I have enough coriander/pesto/palm sugar etc in the fridge or cupboard" wishful thinking, or just totally misreading the ingredients list. I say this proves what a resourceful and experienced cook I am, in that I can always adjust or adapt to make something that closely resembles what it is supposed to. Hubby says it proves that I do things too fast and don't concentrate enough. He might have something there...
 But I do find that this can be one of the fun parts of cooking. Recipes are all well and good, but there aren't many in my receipe book that haven't had one or tweaks by me after the official First Bake (where I do really try to follow the receipe to the letter). And some people (like my sister-in-law) don't even use receipes at all! (which rather scares me) She calls herself an Instinctive Cook - a bit of this, a bit of that, trying to recreate dishes she's seen. I have had some amazing salads from her, but she is also the first to admit that she isn't a baker. Which makes sense, as there is a lot of Science and Measured Ingredients in baking, and if you gets one thing wrong you can often end up with Sludge. Sometimes delicious Sludge (like my many failed attempts at Chocolate Mousse), but looking nothing like picture.
 And THEN you can have a plan or receipe that you follow to the letter (and even have ALL the ingredients) and it's still not right. Or you decide half way through to change (either by force or choice) and it turns out better than the original plan. It's like the old performing adage: If you keep smiling, no one will know that you've stuffed up (or Fake it til you Make it). So here follows my latest baking adventures - for better or worse.

 The first one was another Nerdy Nummies inspired baked off. She did two "roll cakes", which I think in Australia we would call it a Swiss Roll. But the clever thing was that she baked a design into the cake! A plain one and a chocolate one. So clever, and a little bit fiddly but looked really impressive. So with Valentine's Day coming up (where Hubby and would I both be working, so no chance of a romantic dinner or date night), I thought I would bake something for Work.

 I decided on a chocolate heart cake and so created my own template.


 The decoration batter was mixed and coloured pink, piped in hearts and popped in the freezer.

 I then set about making the actual cake batter; which didn't seem to go quite far enough on my tray (I had decided to make a half batch as I had a smaller tray than Ro). So in the spirit of We Can Fix This, I decided to make another quarter batch of cake to fill the tray.

 I then realised that my cake was a very lovely shade of white. Hmmmm. Must have missed the Adding the Cocoa step. It is the only disadvantage of getting a recipe from a video is that most times there isn't a written step by step instructions. Ro is great as she does have an ingredients list in the information section. What I had done was written down the ingredients (including the 1/4 cup of cocoa) but then followed the Plain Roll Cake instructions and forgot to add the cocoa with the flour. Not to be daunted, I knew there was a way to salvage what was becoming a bit of a cooking disaster: I scraped the entire cake (pink batter and all) into a bowl, added the cocoa and then added the other one-quarter chocolate batter I had made. After re-piping and freezing another load of pink hearts, I added the batter, which seemed to at least fill the tray. A quick burst in the oven and it came out looking really cool....


 Hooray! I fixed it!
(well, apart from forgetting to bang the tray on the bench pre-baking which accounts for the extra air bubbles)

 I rolled the cake up and left it cool over night; rather then adding the cream and strawberries then which would make the cake soggy overnight.

 Valentine's Day morning I unrolled my cake and was a bit dismayed to see that it had cracked; had I left it to cool too long in the rolled up position? Had the run of warm weather we have had in Melbourne lately dried it out too much? It still looked rather cool, and with a few well placed toothpicks, it still did kind of look like a roll.


 Thankfully it tasted yummy and everyone "ooohed" and "aaahed" and "how did you get it looking like that?!?". So that was positive and saved it from what may have been a total disaster.
 However.

 It wasn't what I'd call a total success.

 So with a piping bag still half-full of pink batter, I resolved to try again. I had a family lunch the next day which gave me a chance to be creative and try "freehand" drawing without a template.
 Again, came out of the oven looking really clever.

But AGAIN, it cracked after cooling, even more than the chocolate one! Thankfully again, it held together and still looked really clever.


 And luckily, Family are very forgiving and enjoyed it regardless of the cracking. "Tastes great Mum!" said Son 1 helping himself to his second slice.
  

 So two yummy and cool-ish looking cakes. But it did leave me a bit unfulfilled in that I hadn't got either of these cakes to look as good as Ro's. In mulling over this, I may have had the cake too thick which caused the cracking: for the second cake I made the full cake mix but put it on a tray nearly half the size. So IF I ever try this again, I will ensure that I get the right size tray. It is a cute technique that could easily be adapted to a traditional round cake; kind of "icing" it before it bakes!

 The next Baking Adventure was a birthday cake for me! This was inspired by another You Tube channel that I had been put on to by a baking buddy - My Cupcake Addiction. I may have stumbled across this amazing channel previously but had been scared off by her abundant use of fondant. However in my post-fear-of-fondant baking days, I was very excited by what I saw (I think I even squealed). I had seen her work before; I had Pinned a Christmas wreath cake made out of cupcakes as a potential work Christmas treat. I then saw the Christmas Tree cupcake cake, which led me to all sorts of clever Cupcake Cakes. Its such a simple-but-effective idea (bake cupcakes but ice them to look like a whole cake) and I wondered why I hadn't come across it before! So I decided to  make a Star cupcake cake.

 I used empty cupcake papers to decide how many cakes to bake and duly baked them. As my electric oven is not the worlds greatest, and I baked them in three different tins there were not all beautifully and uniformly rounded as they always look online. No matter - frosting will hide all manner of problems!!


 I had made white chocolate ganache and was going to pipe it onto each cupcake (and fill in the gaps) but quickly realised that Piping used up a lot more ganache than the frosting method! In fact I had only piped half the cupcakes before I ran out: What to do?!? Did I do the mad run to the store to buy more cream to make more ganache that then had to be cooled as quick as possible to allow it to be piped? Or adapt?

 I adapted.

 So it changed from a swirly-piped cake to a ganache-as-frosting cake. It still looked like a whole "cake" which I guess is the idea, and considering how rich the white chocolate ganache is, less was probably a good way to go!


 Next, to make the edges of the star I was going to pipe with left-over red frosting from the Lego block cake, but again it didn't look red enough, especially compared to the red cupcake papers. So I used the frosting to stick the cupcakes to the board, and used the red fondant that I still had in the cupboard from the Marvel cupcakes, which looked much more effective.


 Looking good, but how did it go on a practical level? The kids loved it as they could just pull off a cupcake and eat it (well, lick the icing off the top anyway!). It was a bit weird "cutting the cake" at Happy Birthday tine; I ended up cutting half-way through one cupcake (no touching the bottom with this cake!). But overall - a success.

 So there you go - two examples of Best Laid Plans going astray, which turned out all right in the end. Hooray!