Search This Blog

Showing posts with label chocolate cake. Show all posts

Sunday, 7 February 2016

Ain't no Party like a Star Wars party (Episode II)

 So you've done a rather successful Star Wars party for your younger son. You've taken both boys to see the new Star Wars movie and they both loved it. Son 1's birthday is coming up. What theme do you think he was requesting??

 Yep, the Return of the Star Wars party. This time, for 10 year olds.

 As the kids get older, I have been aware of things that Were Cool only a year ago, suddenly become Not Cool, or "for babies, mum!!". Luckily Son 1 was at home for Son 2's party, so I could ask "what did you want at your party?" without seeming like a clueless mum. I was already ahead of the curve, as at his party last year, we switched the format to an afternoon-early evening party time, and gotten take-away pizza as the hot food meal (MUCH cooler than party pies and chicken nuggets). So that was sorted and meant less foods to organise.
 Also, amidst all the cool Christmas presents, we got a "Stormtrooper Cookie Kit" - packet mix cookie dough, white and black icing and a cookie cutter. Son 1 was very excited to be making these; I just had to get over my prejudice against Packet Mix (*sniff!* Mine made from scratch would taste Sooooo much better).


 In their defence, the "just add water" instructions were pretty easy to follow. It was easy to roll out and cook (though only made 10 cookies).
Birthday Boy lending a Helping Hand
 But I did run into some issues with icing them. Rather than use the "icing sugar" mix they had supplied, I used some royal icing I had left over from decorating gingerbread men at Christmas. Because that's what it had been used for, it was a bit thicker than you would usually use to ice a large area. I started with Ro's technique of outlining the cookie shape, then filling in and mixing the icing with a toothpick to get a smooth finish, but that ended up with more icing being pulled OFF the biscuits rather than on. In the end I went with the good ol' knife/spatula option. Worked a treat.

 I did use the black icing gel supplied in the box as it meant I didn't have to try and source or color black icing. *  It worked well; the nozzle was quite small so gave a lot of control. I did try and be clever and make First Order trooper helmets as well, but they didn't look as good in my opinion). The lesson? Retro always looks good.

Same design reference, all different. They're like the Seven Dwarfs of Stormtroopers

(apart from the top middle one - this was the first to be "blacked" with the icing. I think the gel has separated in transit and so was a bit runny at the start. I ended up scraping it off and trying again, which made him look like he hadn't cleaned his helmet. For Shame)

 We had chips and cheezels again, but as we had a new movie (and cool new characters), these were now Jakku Chips and BB-8 bits! (thankfully funny food labels are Still Cool).
Galaxy Bread also made an encore appearance; you're never too old for THAT apparently.


 For the cake, I felt it was time to stretch myself creatively; at least a little bit, in the confines of working and having a dinner the night before. A mini stretch maybe? 

 My girlfriend had her daughter's 4th birthday before Christmas and it was (as you would imagine for a girl that age) a Frozen theme. She had seen on Pintrest that people were using the Disney Infinity game pieces as cake decorations: not only did they look awesome but you could then play with them afterwards! We were quite happy to lend her ours (we are big Disney fans as well as Star Wars),  and it looked very effective .


Frosting + fondant + snowflake cutter + candles = awesome cake
 Which got me thinking that maybe I could use the same theory for this cake. There is a fairly important scene in "The Force Awakens" set in a snowy forest (relax - no spoilers, there are scenes from it in the trailer). So I wondered if I could make a snowy forest landscape for my Star Wars-Force Awakens figurines - chocolate frosting as the "ground", mint sticks for the bare tree trunks, and coconut or icing sugar dusted over all as the snow. Sounds good in theory (and looked good in my imagination), let's hope it translated.

 I started well., with a rectangle cake and a heap of chocolate frosting. I quickly realised after my crumb coat that I had to ignore all the Rules of Frosting; forget all the skills I had developed over several years of decorating. This was meant to be a forest, and one where a lightsaber duel had been taking place. So no smooth edges and neat sharp corners, there needed to be lots of texture and uneven ground and piles of .... foresty stuff. So it was quite fun being very haphazard in my frosting application.


 After leaving space for my figurines, I planted my mint-stick-tree-forest, complete with a few chopped off at shorter lengths, and a few fallen limbs here and there. Realising it needed a bit more texture to the terrain, I also chopped up a few pieces of chocolate to make rocks and boulders, and added any bit of cake that had fallen off to look like moss. Too much chocolate?? Never!**


 We then had a blizzard of coconut (both shredded and dessicated for a more textured effect) over everything, before placing our heroes safely in their scene.

Top View
Side View

 I must admit I was pretty happy how it turned out. Possibly because it was such a simple idea, and also because it was one that I was kind of making up as I went along. This does not always go well (there is usually lots of swearing and wishing I had drawn up a Plan), so it was nice to have an end product that vaguely resembled what I had in my mind.

 I got a big "Cool!!" from the birthday boy and lots of other compliments which is always good. In fact the only drawback was one of the kids who "I don't like coconut!". It was alwasy a risk (at least it wasn't an "I don't like chocolate!"), so he got a piece of cake with the frosting shaved off.

 So another successful Star Wars party. And as the next movie is due for release at the end of 2017, there's not harm in putting away ideas for what will be a 9th and 12th birthday party is there?!?!


* although I did realise afterwards that I had black chocolate melts in my cupboard that would have work well. Next time....

** here was another place where the black choc melts would have looked great - different colored rocks and boulders!!

Tuesday, 21 January 2014

A Marvel-ous birthday

 One of the great things about being a Foodie, and thus reading lots of recipes/food articles and following blogs and flogs and such, is that you are exposed to sooooo many Cool New Things that fellow cooks, bakers and Domestic Goddesses are whipping up in kitchens around the world. The downside of this is the limited time I have to potter around in MY kitchen to recreate and reinterpret the awesome things I see. So I do end up with quite a long list of  Recipes and Techniques to Try, which I then have to mull over every time I have a dinner or event to cook for, and try and decide which one I am going to try next. Dramas!

 So when I had a chance to combine two or three things recently, it was a bit exciting:  As Hannibal (from the A Team) used to famously say, “I love it when a plan comes together.
 Son 1’s birthday is in January and that means a Kids Party to plan and produce. The Party Boy gets to pick the theme (with veto right from me to ensure I think I can work within said theme) so over the years we have had various Superheroes, Star Wars, cars and such. Never one to have a broad theme, this year we’re having a Lego Marvel Superheroes Party. Yes, it is a party based on a Play Station game where all of the superheroes and villians from the Marvel Comic universe are rendered in Lego (check it out if you're into games, its heaps of fun)

Son 1, being quite a intuitive one, requested the usual party food as well as, “Mum, can you do some cupcakes too?”. Hmm, an opportunity to play with more decorating techniques? Well, as you asked so nicely, of course!! A quick Pintrest search of “Marvel Cupcakes” gave me a host or heroes to choose from, as well as various ways to create an Iron Man mask (though the Nerd in me did get miffed to see them alongside Batman and Superman cupcakes – they are DC Comic not Marvel, people!!). A quick review of the fondant and frosting colours available helped me decide who would make the grade and off we went.

I can't work out how to rotate this pic!!
 For Hulk I used green frosting, the rest had red fondant bases, with black fodant details or yellow and blue frosting, with the ol' faithful black (and white) writing icing for the detail.

 For The Birthday Cake, I was at a bit of a loss. In past years, I have done a Spiderman (see here ) as well as an Iron Man cake, so I was loath to repeat myself. The trusty printed Cake Toppers that have served me so well in past years were no help, as this game was only released 3 months ago and I don’t think the Cake Topper (or party decorations) people had caught up yet. Hubby suggested creating a scene from actual Lego figurines on top of the cake which was a great idea, but I wanted the kids at the party to actually Play with Captain America and Loki and such, so another idea was needed.

 Thankfully Ro at Nerdy Nummies came to the rescue with a cake that was so simple in its execution but looked so fantastic (my kind of cooking!) – a Lego block Cake
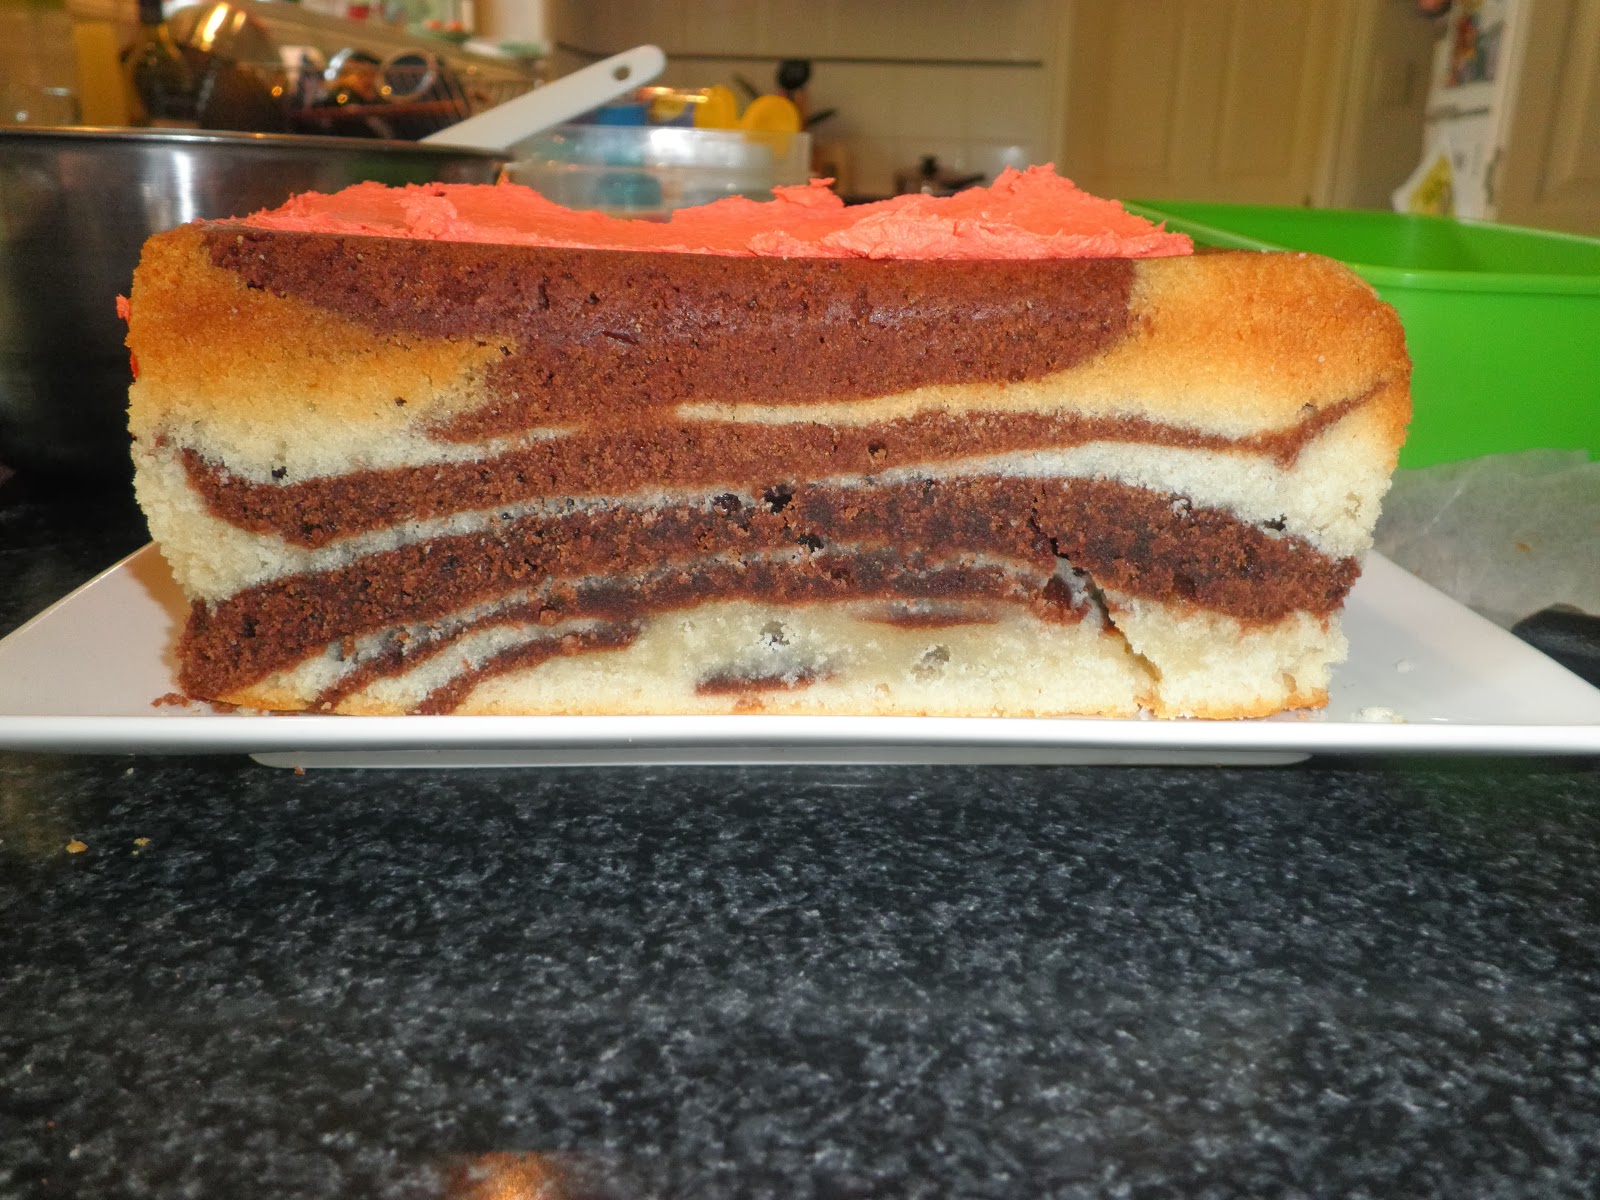
  And while I was re-watching how to make a Lego Brick, I was reminded of another cool technique I had seen her use: A Zebra Cake. Kind of like a cooler version of a marble cake, but I thought it was something that might really impress a bunch of 8 year olds.
 Now although I am a huge fan of Ro and her “nerdy themed goodies”, I do despair at her regular use of Box Cakes. I’m sure it an American thing, but I have about 3 or 4 cake recipes that are probably just as quick and easy (and yummier) than a packet mix. So I decided to use one of these. My standard Birthday Cake is a buttermilk cake that I found in Delicious magazine – it was a recipe for Cannoli cupcakes (you use ricotta cheese instead on cream cheese in your frosting), and I found that the cupcakes were nice and solid without being too heavy, and that if you combined the mix in a cake tin, you also got a lovely solid (not too heavy) cake that stayed moist for a day or two. This is very helpful when you are icing cakes over several days (which I often have to do due to work and child-minding time constraints!). To make a chocolate version, I just added 3 TBSP cocoa powder to my flour and off we went.
Chocolate and vanilla ready to go
 As I started alternately pouring the mixes into the prepared pan, I was reminded of how thick a mixture this cake makes; great for cupcakes and cake tins but not so good for mixing together in nice concentric circles.

  Hmmm – might have to find a runnier cake mix for next time. But it did still look zebra-ish as it went into the oven so that boded well.
  The loaf tin did make it take a looooong time to cook; over an hour in the oven, and the edges were getting quite browned, so perhaps runnier mix and round tin for take 2. But was looking good otherwise...
  Onto the decorating!!
  The first difference I noticed between mine and the Nerdy Nummies cake was the colour of the frosting. No matter how much of the colouring I added, I couldn't get it to that nice brick red colour (and I was using the proper cake food colouring). I think the frosting Ro used is bought pre-coloured, which would explain the vivid shade. As I had red fondant, I did toy with the idea of using that instead, but I couldn't get my head around how to cover the marshmallows. So I stuck with my red-but-slightly-dark-pink frosting and hoped that Son 1 wouldn't mind!
 Icing the marshmallows for the brick "bumps" was also a challenge. Ro dipped hers in the frosting, another example of where the pre-bought frosting was easier as it is much runnier than mine (I have used it once on a cake and actually found it quite difficult to work with!). The butter frosting was quite thick and tricky to get onto the marshmallow; I tried holding it on a skewer and covering it but that just ended up gouging out its centre. The technique that I had the most success with was loading up the curved edge with fostering, putting it on the cake and tidying up the top.
It worked pretty well, but I still got a bit of frosting on my fingers. But it still did the job and looked quite impressive.

 The party day arrived and we have five 8 year olds running amok for a few hours, eating fairy bread and such. They were all quite impressed with the cupcakes, arguing over who was going to get which hero. "Happy Birthday" and blowing out the candles all went fine, and so we headed to the Cutting Of the Cake; which did look suitably zebra-ish.

However.

The cake wasn't cooked through.

 I will admit that I wasn't surprised; the cake had fallen in the middle quite a bit when it cooled which is never a good sign. But I basically had a crisp shell surrounding liquid cake - argh!! I think there must have been something wrong with my oven that day as my cupcakes had a few uncooked bits as well and I have made that recipe many times.

Not my finest hour...
 Thanks goodness this Baking Disaster was with a forgiving audience, who went "Wow!!", ate the icing and then went back to playing. I ended up throwing the whole rest of the cake out and feeling like a bit of a Domestic Duffer for the rest of the afternoon. Thankfully Son 1 didn't care as he got to have one of the Deadpool cupcakes ("My favourite, mum!").

 But I will not let this beat me. Obviously the buttermilk cake is not a good option for the zebra cake technique, and definitely not a loaf tin. I think the next time I try will be in a round tin, and using a chocolate mud cake recipe which I know is runny mixture; I will just have to check that my white chocolate recipe is of a similar cooking time.

Or maybe I'll just use a packet mix...

Wednesday, 27 February 2013

B is for Birthday (and bubbles!)

 It was my birthday at the weekend - Happy Birthday To Me!

 For as long as I can remember I have liked Birthdays - the presents, the lovely messages, the catching up with friends and family, the legitimate excuse to have lots of yummy (and often bad for you) food and drink PLUS being The Centre of Attention; what's not to like?!?!? As part of my annual Birthday Celebrations, I generally have a Family catch-up (traditionally a backyard BBQ) and a Friends catch up at whatever new or cool restaurant I've unearthed that I want to try out. Last year my birthday fell on a Wednesday which was most annoying and very tricky to organise - do you celebrate the weekend before or after?? And I work on Wednesdays and thus I was unable to cook up any type of storm, so Friends and Family all decamped to my local pub for a rowdy and raucous dinner in the bistro. Lots of fun (and no cooking or cleaning up for me) but no new Cooking Endeavors.

 So this year I was looking forward to trying out at least one or two recipes from my never-ending collection of Yummy Thing to Cook. I invited some friends over for dinner on the night of my birthday; we could have gone out somewhere but my Restaurant of the Moment is The Black Toro which makes divine Mexican food but is not always a cheap option. So I decided to have a dinner party at home. Which to most people is the antithesis of Birthday Celebrations: "Why are you doing the cooking on your birthday?" Because I Like To. Because I enjoy it. Because I love trying new recipes and sharing them with friends. Because its My Birthday and I can do whatever I want!! And Cook whatever I want (taking into account guests likes and dislikes, of course). So this led to several lovely hours flipping through cookbooks, and mixing and matching various meal ideas; something relaxed and fun like tacos? Or themed like a Moroccan feast? Or go all out and try some molecular gastronomy?? I did decide that cooking fresh doughnuts for dessert was probably not a good choice as deep frying after a few glasses of wine would not amuse the Health and Safety guys (i.e Husband).

 So after much deliberating I settled on  pork belly for mains as roast pork was always one of my favorite dishes growing up, and I hadn't been brave enough to tackle pork belly yet. I had a recipe from the Vineyard Cookbook ("Max's Tuscan Stuffed Pork" from Max's at Red Hill Estate - one of my favorite wineries) that I had earmarked the first time I looked through the book, but had never had the appropriate occasion. I also hadn't had a good look around for where to  buy pork belly, but that gave me a good research project. The recipe suggested serving it with mashed potato (meaning it was probably better suited to a mid-winter feast rather than a late summer birthday. Oh well!) so I decided to make 'Paris Mash' by Guillaume Brahimi; as The Frenchman and his wife were dinner guests it seemed appropriate! And then to add a bit of color (and something cholesterol free!) with some green beans. I was tossing up between a few versions of some sort of chocolate flan/tart thing for dessert, until I came across a Baci Gelato recipe in the Delicious Summer Special. Having already had one Epic Fail at Baci ice cream (read this to be reminded) you may wonder why I chose to revisit such a Disaster. Well, this recipe looked a lot more like  other ice cream recipes I had been making (and Delicious magazine haven't really steered me wrong yet), and I was not going to a let a recipe (let alone a chocolate related dessert one) beat me! Plus it would hopefully appease my not-a-fan-of-dessert-Husband.

 Birthday Day arrived and after a lovely day at work with text messages and cookies and cupcakes, I headed home early, because well, hey! It's my birthday! I picked some herbs from my garden (because I can and I love it) and  proceeded to Prepare The Pork. Knowing full well that The Crackling will either make or break a pork roast, I followed the anecdotal advice to dry it out as much as possible before cooking. I also knew that Salt was an Important part, which was not a problem in this recipe as roughly 1/3 cup salt was used for 1.2kg of pork! So lots of lovely pink Murray River Salt Flakes were rubbed all over the skin, plus inside with the herb and fennel mix before the whole thing was rolled and tied. Into a  lovely hot over it went for an hour, then lowered the temperature for the next hour or so. It smelled divine while cooking which is always a good sign, but I was more interested in how it crunched! I churned the ice cream while the pork was cooking, and it was going so far so good with Baci Mark II - it was already way ahead of the other recipe in that the custard had actually thickened on the stove! I also prepared The Mash, which had an interesting twist in that you cooked the potatoes whole with the skin on and THEN peeled them. I'm not sure how this contributed to the end product but I won't argue with a Frenchman. After peeling them and passing through a potato ricer, the mash is then put back in the saucepan for a few minutes to remove excess moisture. THEN you mixed in hot milk and a LOT of butter - the recipe had 600g of potato to 250g of butter! I think its safe to say that it won't get the Heart Foundation tick anytime soon, and no wonder is supposedly tasted divine! I cooked just under 500g of potato for the 4 of us and had out about 120g of butter, but it was getting to quite a liquid consistency before I added it all so I stopped (and I think I heard my arteries cheer as I did).

 Guests arrived, champagne was popped, presents were given (Hooray!) and then it was The Moment of Truth - Crackling Time. And it did (double hooray!). It was so crispy and crunchy, but the meat inside was still tender and just about falling apart as I carved - yummmmmm. In fact it was so yum that there was hardly any leftovers! I will definitely make more nexy time as cold roast pork sandwiches are delcious.

Bon Appetit!

 The ice cream set beautifully and was also delcious, with the white chocolate-hazelnut slab on the side. So obviously the culinary angels were smiling at me on my birthday. Success!

 Now onto the Family Gathering. Mindful of keeping things easy and relaxed, summer family get-togethers are generally BBQ related - everyone can bring a salad or dessert and it all works well. In previous years I have served various kebabs/shaslicks combinations, slow roasted and marinated meats and even Beer Butt Chicken (Google it if you are unfamiliar with this quirky cooking style). This year I expanded on an regular family dinner idea - mini hot dogs. Grab some small chipolata sausages and a packet of Bake-at-Home dinner rolls and it makes a nice change from sausages-in-bread. To make it a bit more Grown Up for my party, I cooked onions and had out shredded cheeses, tomato and barbeque sauce as well as American Mustard, so you could have your 'Dog with whatever 'fixins' you liked. Easy to prepare, easy to serve and yum and fun to eat.

"Whad'll it be??"

   And then there was The Cake. For what is a birthday without a Birthday Cake?!?!


 I found this recipe in the January Delicious: "Indulgent Chocolate Cake with Dulce de Leche".

 You had me at Indulgent. You had me even more at Indulgent Chocolate Cake!

 And they weren't kidding - four layers of cake with chocolate filling and caramel in between . Probably a bit too much for my usual dinner part desserts (it served 8-10 and I don't think it could have been easily adapted for a half or quarter version!), but it sounded perfect for a Birthday Cake.

 Well, not only was it Indulgent, it was also Involved. For the cake batter, you had to cream the butter and sugar, then gradually add flour and alternate it with buttermilk, THEN add whipped egg whites! 


  The Filling was whipped butter and sugar mixed with melted chocolate, and to assemble, it was a layer of cake, then chocolate filling, then dulce de leche (which I couldn't source so I used Caramel Top n' Fill - sneaky!), repeated 3 times, then topped with melted chocolate. Obviously a Weight Watchers - Diabetic Australia Approved recipe!

 It was the first time I'd made a multi-level cake and a I managed to avoid some of the rookie mistakes such as cutting uneven layers. The only issues I has was the Stability of the Cake! It was warm day and the filling was very soft which meant there was a bit of sliding when putting on the top layers! Eeek!

"Steady...steady!!"
 I managed to keep it all together and even piped on some flowers to make it look all pur-dee.

('T' being my girlfriend who had her birthday on the day of my party) 

  And good lord it was Delicious. Thankfully not too intensely chocolate as some cakes can be, just very sweet and yummy. Everyone was very happy with a small slice (which was no mean feat trying to keep all four layers together during the slicing!) which did mean I had about a quarter left over. Thankfully its all gone now; I managed to "share the calories" with my work mates and also deliver a piece to my cousin who had missed the party. I think my blood sugar is just starting to go back to normal....

 However, I have already had a request to make this magnificent cake again for one of my Ladies Lunches I have regularly with some girlfriends. I felt a little like the guy in MacArthur Park (no, my cake didn't get left out in the Rain)  "cause it took so long to bake it! Oh noooooo!!!" But its not the difficulty of the cake, more that there would be only three of us to share The Cake, which not be good for any of our waistlines. Maybe I can save it for one of their birthdays....

 In the meantime, I have 360 odd days to work out what I can cook for my birthday Next Year! Might just go flick through a recipe book now......

Sunday, 6 January 2013

Let Them Eat (Decorated Cup) Cake!

  So here is my latest Thing; where “Thing” is loosely defined as That Which I am currently Getting Excited over, which consumes my Thinking Time and often ends up with spending money.

 Cake Decorating.
 Which has kind of been a simmering Thing for a few years now, but has recently gone to the full rolling boil.
 There are a few sources from which this Well of Enthusiasm for the Icing and the Piping may have sprung. Firstly the many childhood hours spent pouring over the Women’s Weekly Birthday Cake Book (the original with the train cake on the cover – all good 80’s mums had one!) and deciding which of the amazing cakes I would have to the next 5 birthday parties. I never did end up getting The Castle but O Joy! O Rapture! the year my mum learned how to make a Dolly Varden ice cream cake!!
 Or maybe it was the rather impressive cakes my girlfriend made for her daughter’s parties (she was the first child born in our group of friends). The cakes in the first few years were good, but then she really hit her stride and we were treated to an Emerald City (for a Wizard of Oz themed party; it was The Castle! In green!!), a merry-go-round, and even a foray into rolled royal icing with a moulded sleeping child. So the bar had kind of been set high.
 

 My own personal forays were what I’d call Simple But Effective; they didn’t take hours to make (some of the above-mentioned took up to four hours to create, baking not included!) but still looked good.

 We had Mr Hankey (from South Park) ...
  … Mud Cake cut into shape with licorice arms and mouth, marshmallow hands and hat trimming and a red roll-up (how that stuff is termed  ”fruit” I have no idea) for the hat.
  Got a bit more creative for a Murder-Mystery Birthday party; props, different colored icing, “piping” and even food coloring fingerprints.


 Then I became a mum and had two annual (and sometime up to 4) birthday parties (and thus cakes) a year. Before I discovered cake toppers (the amazing printed icing sheets that kids think are waaaaaay more impressive than anything you take hours to make, and only take 10 minutes for you to decorate your cake! Win-Win!!), I did the number-cake thing for a few years. But I did refer back to the WW Cake Bible to make a Mickey Mouse…

…as well as a Spiderman. Hint – the ‘writing icing’ you can buy at the Supermarket is a godsend!!

 So all not-too-tricky, looked quite good and everyone happy.
 Then I had the delightful opportunity to go along to a Mamma Bake Cake decorating class (www.mammabake.com.au). They come along to your house and bring EVERYTHING necessary (cupcakes, icing and ganache, piping bags and tips, patient instructor) to learn how to make amazing looking cupcakes! Brilliant!! They also sold all the tools required so I came home with six beautifully decorated (if oddly coloured) cupcakes, a new set of piping equipment (sorry Tupperware, your set was just not cutting it) and Enthusiasm to make hundreds more cupcakes.

  But where precisely was I going to use these fabulous new skills? Being a mum of two boys meant I wasn’t going to be called on very often to make roses and flowers for their cakes. In fact, Son 2’s response to my cakes? “They’re very girly ...” So I knew I had to get creative to use my new creativity.
 Luckily Christmas was coming up, and with it, lots of Catch-Ups and Dinners and Bring-a-Plates. Excellent.

 First up were some Rudolph cupcakes straight from the Mamma Bake website. I did tweak them a bit so I only had to make one lot of ganache, but as this meant there were more lollies involved so I didn’t hear any complaints!

   
 So we had piped chocolate ganache, pretzel antlers, white chocolate button with MnMs for eyes, and a half marshmallow with a half jelly baby (because I had them in the cupboard!) for the nose. They looked great and the kids (of which there were 9 at this particular gathering) devoured them with great joy. Well, they devoured the icing at least (though I’m proud that my son was one of the only to eat the cupcake as well – a good kid who appreciates good baking).
 So this was a great First Experience that taught me a few things: ganache takes a LONG time to cool/set before it gets to a good piping consistency (chilling it in the fridge helps but it still takes a few hours). And I really needed to invest in a cupcake carrier! There were quite a few large roundabouts to navigate on the way to The House, which I took at a very slow and sedate speed (Must Protect Cupcakes!!).

 Next up was a Christmas Family Gathering. I had been inspired by a photo on the Mamma Bake website of some very cute themed cupcake designs which would enable me to use more of the piping tips and techniques I had learned. So I created a few more designs of my own, baked a batch each of chocolate and vanilla cupcakes, dipped them all in white chocolate ganache, coloured my butter icing (red and green of course) and I was Ready to Pipe.

 Two not-as-frustrating-as-I-thought-it-may-have-been hours later, I had these….
 Not too bad methinks. There was lots of practising first and remembering the techniques (“ohhh, you hold it the Other way!”) and switching back and forth between colours and tips but I was pretty happy with my effort.
 And so was everyone at the party – lots of “oooohs” and “aaaahs” and “did you make those???” However, no one seemed to want to actually Eat any of them! Apparently they DID look too good to eat. Hmmm, a problem perhaps? But I did manage to send everyone home with one for their morning tea the next day, which was great as it meant I didn’t have to eat 20 or so cupcakes!

 My most recent foray was more exciting as I got to make flowers and decorate pretty girly cupcakes. My girlfriend's little girl was having her first birthday party the weekend before Christmas, and if a First Birthday isn’t the time to go all pink and flowery (especially as she has two older brothers) then I don’t know when is!! I had pretty pink proper cupcake papers (try saying that three times fast!) from her mum which made things a little interesting, in that they made taller and thinner cupcakes than the traditional concertina papers. This changed the cooking times and meant I had less “area” on top of the cupcake to work with. As I had done my previous “practice” on larger diameter cupcakes I was a little concerned about whether there would be any issues with the smaller space. Plus I was piping ganache with a smaller tip which we hadn’t been shown in class (so I wasn’t sure how it would turn out or if it would work at all). PLUS it was the first time I was making Proper Flowers since the class. So after a few deep calming breaths, I waded in.

 The flowers went alright….

 And the rest of them turned out pretty good as well!
The 6 different designs
Close up of The Rose
 
Ready for the Party!
  But again, hardly any were eaten at the party! Whether the papers made them too tricky to eat (you have to rip them away from the cupcake; much trickier than the normal papers), or people were put off my too much icing/decoration on top (I try not to pipe too high or too much as this is something I don’t like about a lot of cupcakes; when there is more frosting than cake!), or again they were “too pretty to eat”, even though I had made some “simpler” designs (such as the ‘1’ and ‘A’)  that would be easier to eat. Hmmm … this is not a good pattern developing here. But I still had fun doing them (and I’ve got to get value for money from my piping set) so I will carry on!

 Next Up? I’m looking for inspiration for some Lego related cupcakes for Son 1’s birthday.

Pipe on!


Sunday, 19 June 2011

Baked Goods....

 One of the things I love about a new recipe book or foodie magazine is creating the List of New Things To Cook; so much potential!! So much yumminess awaiting! But it is a bit tricky when the recipe are variations on ones I already have in my files. What to do??? Do you stay loyal and not even try the new version? Or give it a try, realising that you may have to part ways with a recipe that has served you faithfully for many years for the younger cooler version?? What a delicious conundrum!

 This happened to me recently after Delicious magazine ran an article about the lady behind The Maven Bakery (which is apparently a very famous in Sydney institution). There was a great selection if yummy things to bake, but there were a few "double ups".

  The first was The Maven Fudge Brownies. I have a fabulous brownie recipe that was sent in to Epicure by a reader and it has seen me through many compliment laden lunches, dinner party desserts, baby showers and "Because It's Friday!"s at work. But they were more at the 'cake' end than the "fudge' end of the brownie scale so I thought it was worth a shot. Similar ingredients and method with melting chocolate and adding ingredients to it; the new one asked that the eggs be beaten for 10 minutes, which with a hand held electric mixer was a bit of a pain (my fairy godmother hasn't procured a KitchenAid yet!). Also walnuts were the added nut whereas my favorite is macadamia. They also did the favoured step of adding coffee to a chocolate dish, which, as a coffee non-fan I am always wary of.

 However.

 They were kind of awesome.

 Very fudgy, but still cakey; dense, but not in the make-you-sick way. They received rave reviews up and down my work department (AKA The Guinea Pigs).
But where does that leave my first love? I sense a Brownie-Off in the future where we can compare them side-by-side.

  The next try-out was Double Chocolate Cookies, which wasn't strictly a double up. My first cookies recipe was for Tollhouse cookies and was from the side of the choc-bits packet. Your basic cookie recipe and quite delicious for such an inauspicious beginning. The next version was for Neiman Marcus cookies (from the famous? American chain store). A bit more fiddly, with the addition of oatmeal and grated chocolate, they were crispy on the outside and chewy on the inside; the closest home made to a Mrs Fields cookie I had tasted.
So this was a chocolate dough (cocoa was added in with the flour) and white chocolate chunks through. A different technique in that you rolled up the dough into a log, chilled it and then sliced it up (rather than just spooning them onto a tray) to make very profesh looking cookies

 And they were yummy!

 So I think these two can sit side by side and co-exist quite nicely in my repertoire. I can have an Ebony and Ivory (living in perfect harmony), or a piano keys cookie combination!

  The final of the trio was Mandy's Chocolate Cake (Mandy being the Maven Bakery lady). It came with the endorsement of "This is my bulletproof cake. It's easy to make, dense and not too sweet!""

 High praise indeed.

 So my expectations were raised, especially as my Mississippi Mud Cake, is MY "bulletproof cake". So yummy and easy that is had become my standards kids birthday-cake cake, as it will stand up to a tonne of colored frosting quite well.

 Firstly, Mandy's cake was in 2 cake tins, so automatically more washing up. The two cakes didn't rise that much, so I was unable to cut them in half as requested (to make a triple layer cake) which wasn't a big drama, but a deviation none-the-less.

 Then I made the 'filling' - melt chocolate, mix in cream cheese etc etc etc

 THEN I had to make the glaze, which had an egg in it, meaning it was supposed to thicken.

 But it didn't.

 So it was very runny all over the cake and plate and bench and such. Hmmm ....

 So for me the cake itself was easy, but then you still had to make the filling. And the Glaze. And then put it all together. So that part - not so easy (well, doing nothing except putting it on a serving platter is easier!)

 It was dense - quite nice
 

And it was 'not too sweet', but that may have been the over 1 TABLEspoon of coffee essence! Quite coffee flavoured for a chocolate cake (not not really my thing). So although it was quite nice - the ol' faithful wins out (hooray!)

But stay tuned for the results of the "Brownie Off" ...