Search This Blog

Monday 15 December 2014

Hot Chocolate

 I do love it when you work out a solution to a problem – especially when it doesn't involve paying someone/buying something/spending hours searching on the internet. It can be as simple as a system for taking washing off the line (Things that needs a hot iron off first so they are at the bottom of the basket and will be ironed last when the iron is the hottest), or for keeping you Tupperware drawer tidy (lids all in one spot people!). Thankfully this was a bit more of an interesting problem to solve – how to keep melted chocolate, well… melted.

 After my recent fondant fetish (click here and here and here!), I had started experimenting with melted chocolate as a decorating tool. It started with plans for Son 2’s Minecraft birthday party, which involved making black shapes for Creeper faces.
This is a Creeper. It explodes if you get too close. Just so you know
 While I was wandering the cake supplies shop, I noticed that black chocolate melts were much cheaper per kg than the black fondant. Interesting. PLUS chocolate could be piped in fine lines for smaller creeper faces (which I was planning to put on green rice krispie squares for taking to school) , where as it would be annoying to cut out very small slivers of fondant. AND it always looked so easy when my You Tube bloggers used it – what could possibly go wrong?

 Well.

 Melted chocolate assumes a liquid form. And the hotter it is, the more liquid it becomes, to the point of it oozing and not making pretty straight lines like you are supposed to. Not good when you are a perfectionist bordering on–OCD.

Not my finest work. They either look possessed, evil or stupid (still tasted yum though).
 Melted chocolate also has a tendency to set when it cools. And this doesn't always happen once it is piped out, it can also happen while it sits in your piping bag. Which leads to lumps of semi solid chocolate blocking up your piping nozzle, and it coming out unevenly. Which leads to much Fiddling and Fixing and Touch Ups and Swearing and Stress.

Like a Monet - good from a distance but a mess up close
 At first I thought it was just the colored chocolate, as it took quite a while to melt and didn't really mix together very well. But when I had the same problem using good ol’ Cadbury that I realised it was a Chocolate Issue.

My Groot Sundaes: more "messy" than "gnarled tree" appearance
(click here for what they were supposed to look like)
 So what to do?? I could use royal icing for all of my future decorating. It pipes nicely, colours well and you can keep it in the fridge between times.

(and a little goes a long way)
 But it doesn't taste as nice. And it’s not chocolate.

 So a solution had to be found. Especially with my plans to make gingerbread trees for my Christmas gifts this year.

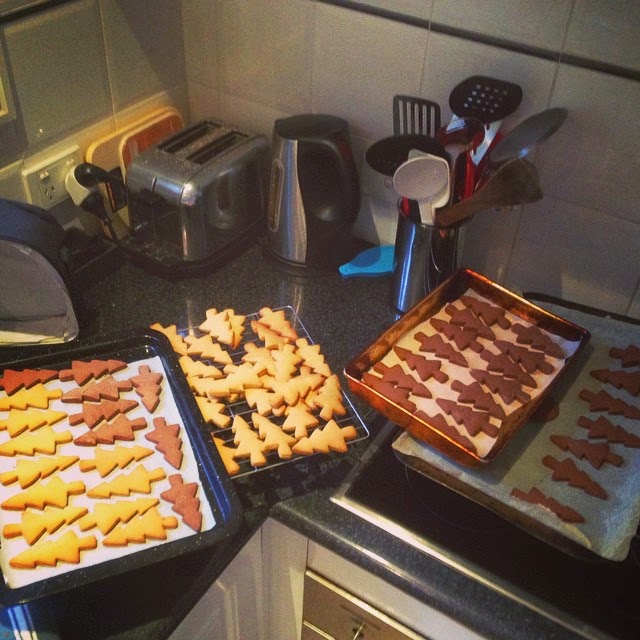
LOTS of gingerbread trees!  (this was batch 1 of 3)
 At first I tried microwaving the chocolate intermittently, which worked well. I found I could ice and decorate four trees before it needed a minute in the microwave. But I had to unscrew the metal piping tip and scrape out the solidified chocolate each time. Annoying. And stop piping. More annoying.

 I did think about some sort of hot water bath to put the piping bag in, but I have found the no matter how carefully you seal the bag up or pop it in several plastic bags, water still gets in and ruins your chocolate. Not helpful

 There are cool cups (as in Cold, rather than Clever and Awesome) that you can put in the freezer to keep your drinks cool over summer, I just needed a Hot version .

 So I made one myself! Pour boiling water in a large cup, place a smaller cup inside and voila!

 (I shall add a picture here when I take one at this weekend's piping session)

Pop your piping bag in it in between sprinkled sanding sugar or carefully placing cachoos and you are ready to for your next set of trees. So simple, so cheap, so effective, so clever (well, I think so).
Oh! Christmas tree (s)
 So I hope that this has helped you to keep your chocolate hot and your piping pretty.

In other Kitchen News, I received a kitchen blowtorch at the weekend, so look forward to a creme brulee post in the future (which will hopefully not be entitled “What can go wrong with a Kitchen Blowtorch" or "Effective Ways to put out a Kitchen Fire")


Tuesday 12 August 2014

Super Soups !

 Is there any meal that says “winter” like a soup? Sure, roasts are great in the cold months, but can also say “special occasion”. Some of the slow cooked meals (like braises and curries and stews (oh my!) can whisper “winter” but can also say “time efficient cook”. But mention a bowl of soup plus/minus a bit of bread and you can practically see the frost on the ground and feel the extra layers of clothing.

 I’ve had a good relationship with soups over the years, especially considering we didn’t get off to a good start. Not liking tomato as a child, I avoided tomato soup and so the only other option was packet chicken noodle soup (or Campbells’ Cream of Chicken if you were feeling extravagant. In fact I think a Can of Soup was one of the first meals I was allowed to make by myself). My mum found a recipe for Chinese Corn soup after we had it out at a restaurant, and this became one of my favorites because of the “stringy egg” ingredient (made by slowly pouring egg into the boiling soup while stirring). One of our favorite family culinary tales involved my dad and the first time he made Corn and Bacon chowder: when the recipe called for a “pinch” of cayenne pepper, he gave a few shakes over the pot because, well, it was a BIG pot of soup, and his grandfather had used cayenne on his dinner the way most people use salt. Needless to say we didn't eat much of that soup (the next cayenne-less batch was much more readily digested). An easy recipe for Mulligatawny soup meant that it became a mainstay for our regular mums-at-home lunches, before being superseded by the even-easier and super yummy Wonton Soup (boil your wontons in a bit of chicken stock, ginger and soy sauce, add bok choy and sprinkle with chopped spring onions). Even cup-a-soup have helped out over the years on the I-can’t-bear-to-take-a-sandwich-for-lunch days.

 I find that the cooking magazines and sections usually start throwing in a few soup receipes around March, so by this time of the year I have amassed a good collection of new ones to try. Regular readers will remember my recent soup related escapades, so at the risk of repeating myself, click here to read about Ribollita with Italian Meatballs and Chicken and Kale soup.

 The next soup that caught my eye was a Bacon and Red Lentil soup. I perked up at the description of A Cheat’s Version of (well, "similar in taste" to) Pea and Ham Soup , which I have never been a fan of, but Hubby is (and I’ve never quite got around to buying ham hocks and making if for him. The shame...). This one had lots of veges and lentils for protein, which is something that I do love about soup in that it can be a complete meal nutrition wise, depending on what you put in it (most have veges, so throw in a bit of protein and a bit of bread on the side and you’ve covered your main food groups!). It started with frying bacon, onion and garlic, which is a good start to any non-dessert recipe. It thickened up quite a bit after the lentils had cooked, and once it was blended it was one of those super thick “stoups” (stew-soup) that you could almost stand your spoon up in. And it was delicious. Probably helped along by the yummy smoky bacon I used, but it was so good I wanted to climb in the bowl. I will be making that one again before the winter is out!

 I then spied a Kumara and Peanut Butter Soup recipe on a fitness clothing website, to which I though “I have to try that. Peanut butter soup?!? Crazy!”. We are big fans of peanut butter in our house, so much that we buy the Skippy 3 Lb (1.36 kg) jars from Costco. I have made peanut butter cookies and brownies and used it in the odd Asian dish, but never soup. I will admit that I wasn't enthused when I had all the ingredients in for the “simmer until tender “ part: it had chunks of sweet potato, red capsicum and tomato floating in  a pale milky water-coconut milk broth. Not very aesthetically pleasing. Thanks goodness for the Blend Until Smooth stage, as it is one of the best soups I’ve tasted. The best way to describe it as a satay sauce soup (flavour wise) with the stodgy-fill-you-up-ness of a good minestrone. And super healthy too – it even used coconut oil! And even Hubby, who when I told him what I was making had done the Polite Decline (“… but I’ll have a taste”) came back and ate a whole bowl. And the Peanut Butter Soup label almost enticed Sons  1 & 2 to try it (almost).
Photo credit to Hubby - thanks!
 So I was going quite well with my soup choices. The next one on my list was Kumara and Red Lentil, which gave me pause. I had already made a soup with red lentils, and this recipe didn’t have bacon. Plus, I had used kumara as well, but this one didn’t have peanut butter. So I took pity on that Recipe, which probably would have been quite nice had we had it first, but would always suffer comparisons to The Others, and I decided not to make it. So it must be about time to go through my “Soups” section and make a few of the stars from previous years. Pasta e fagoli? Thai pumpkin? Or Mexican chicken nacho???

Wednesday 30 July 2014

C is for Coconut, K is for Kale

 I have never been into fads. Fashion-wise, I have always been a jeans-t-shirt-classic-pieces kind of girl, rather than the latest So Hot Right Now!!! (but not in 5 minutes) disposable fashion: I have not, nor will I ever own a pair of harem pants.
 So it follows that it takes me a while to jump onto the latest foodie gimmick - whether its a cooking style (hello sous vide), an ingredient (well, chipotle and I are friends now) or superfood. I need to read about it in several different places, maybe see it used in a few recipes and perhaps have a friend chat about their experiences before I'll feel brave enough to buy some and give it a trial. Quinoa and I started this way: I had heard rumblings about this gluten-free-grain-that-wasn't-a-grain that everyone had difficulty pronouncing. I started very slowly by using it in a salad, before graduating to fritters and porridge (which I now LOVE). So it makes sense that it has taken me this long to get around to using kale.

Yes, I know, its the latest superfood!!! Its high in anti-oxidants and has heaps of vitamins and minerals and stuff!!! It's SO versatile!!! (maybe its the enthusiasm that actually put me off, I mean it looks like curly parsley on steroids, how can it be THAT amazing?) But finally, there were a flurry of recipes in a couple of Delicious magazines that were cook worthy, so I grabbed a bunch of kale and got into it.


"It doesn't LOOK that super..."

 The first recipe was a "Ribollita with Italian Meatballs", which is a Tuscan "stoup" - lots of veges in stock with some meatballs to give it some oomph. The original recipe used cavolo nero, but I thought one green was as good as another and so used kale. This is a good way to use kale (or other winter leafy green) as when you cook it in the stock, all the nutrients stay in the dish (said the intro to the recipe). And it certainly did taste like a big bowl of goodness - nice and thick and hearty for the middle of Melbourne winter.

 (no picture I'm sorry - we ate it too quickly)

 Continuing with the soup theme was a "Chicken and Kale soup", which apart from having shredded kale through the dish, also had the chicken cooked in coconut oil (more on that later) as well as almond meal stirred through. Which did make for an interesting consistency, but again tasted quite nice.


"Cloudy with a chance of Kale"
 Probably not as hearty as the ribollita, but then it had about half of the ingredients. But a nice way to use up the kale. We were now down to two thirds of a bunch. Have I mentioned yet that a little goes a long way??

 While the soup was simmering, I gave Kale Chips a try. This was something that I knew had given kale its popularity - a healthy substitute for potato chips!! And so quick and easy - just rub in a bit of olive oil and pop them in an oven, These were "Spicy Kale Chips" and so had garlic, cumin and chilli mixed in with the oil. Quite yummy, but I did have my oven a bit hot (or got distracted and left them in too long) so half of them were a super crisp dark purple color and not very appetizing looking (so again, no picture, though the chickens loved them).  I will try them again with more attention to the details.

 The weekend rolled around and I came down to Hubby making brekkie of scrambled eggs, which reminded me that there were lots of uses for kale in breakfast dishes (which is good as I still had just under half a bunch in my fridge). I was planning on doing kale in scrambled eggs, but realised that didn't have quite enough eggs to make it for everyone. So I switched to what I am christening "Green, Eggs and Ham" (well, bacon). Fry up a few rashers of bacon, then saute your shredded kale in the bacon fat (soooo healthy) and fry an egg.


"Healthy" fry up
 Pop it all on a piece of toast (with avocado or aioli or whatever) and voila!
 
I DO like these Green. Eggs and (Bacon)Ham

 So that has been my Kale adventures so far, and I still have about a quarter of a bunch left to use. Hmm - might have to google some more receipes.

 The next Superfood to enter my pantry is coconut oil. Again, I had been hearing about it here and there (It's great to cook with as it has a high smoke point!!! Its full of healthy fats!!!... and you can look up the rest, there are lots of very long lists), but it wasn't until I has some falafel that my no-dairy-gluten-soy-and-generally-super-healthy friend had cooked in coconut oil was I convinced to try it (it gave them a delicious slightly nutty taste). AND after another friend gave me a jar of oil to try (before I buy!... bought), I had to give it a go.
 First up was cooking our Sunday morning pancakes, which was a perfect use as it didn't get burnt (like butter) when I left in in the pan too long (to get juice, cut up a pancake for Son 2, more syrup for Son 1...), and the subtle coconut flavour went really well with the maple syrup. I then used it as the "vegetable oil" in my standard muffin recipe (instead of the sunflower oil I usually use), and threw in a handful of shredded coconut and before I knew it I had banana coconut muffins! Quite yum. and very moist too.

 And amidst all the reading about how awesome coconut oil is, I read that coconut milk also shares a lot of similar health benefits. Which is great as I love using it in thai food; it always makes curries and laksas taste so decadent. But they suggested using it to cook quinoa porridge (instead of the soy milk I had been using. I'm not lactose intolerant, I just don't like the taste of milk) - which I did. And it was Ah-mazing!! So yummy and nutty and creamy - it didn't taste like it should be that good for you but it was! I know some people will say "Fat is fat and you should watch your intake" but I am a fan of the Good Fat, which is why I always found it hard to stick to low-fat diets in my younger days. Now I try to limit refined sugar but happily munch on nuts and avocado and cheese and I can seem to stay on track diet-wise.

 So I am happy to add these new foods to my pantry and fridge and will keep an eye out for the next foodie fad to come sweeping our way. But I think I will be sidestepping the edible insects craze, no matter how much I hear about it!


Sunday 22 June 2014

Yule Do It Again (or Things go Better with Pork *)

* with apologies to my Jewish (and vegetarian) readers, this blog may contain genuflections at the Shrine of Swine.

 So, even with global warming and climate change, the earth keeps spinning and we still have our shortest day and longest night. Which means there is an excuse to get the Christmas decorations out mid-year and have another Yule Dinner! (click here for the reasons why this makes more sense in the Southern Hemisphere)

  As in previous years, we had The Roast – this year it was a “rolled turkey breast with cranberry stuffing”, not surprisingly, from a Delicious magazine ‘Christmas in July’ special. The stuffing began with cooked onion and fried pancetta, so I was pretty sure it was going to be yum (and it definitely smelt that way!). As well as this being a very festive recipe (the stuffing also included pistachio nuts and the aforementioned Cranberries), it had a separate recipe for gravy.

 Domestic Goddess Confession time: I am terrible at gravy. As I may (or may not) have mentioned before, it took me a long time to be comfortable with The Roast. For something that was such a stalwart of my childhood diet, and that I saw my mother/grandmother/ aunt/other sundry female relative/friend make over and over, I struggled getting it right. It took me many years and many different techniques before I finally found a bulletproof roast potato technique (I even bought frozen roast potatoes in my early days – the shame!!). I now have a few good Roast recipes under my belt, but gravy still seems to elude me. Maybe it was the ease at which my mum mixed up the Gravox and pan juices (which I then dutifully stirred while Dad carved). Mine always ended up lumpy/watery/ flavourless, so I have been a big fan of the pre-prepared pouches of gravy that you can buy in the supermarket. But as this recipe has separate instructions for gravy that did not rely on “pan juices” (and could be made earlier) I thought I would  give it a try. I’m happy to report it was a success; the technique was not unsimilar to making a roux for a white sauce, so maybe I’ve Learned Something for the next time I’m brave enough to try Gravy.

 Roast was suggested to be served with a “potato and porcini gratin” which sounded a bit fancy (and similar to last year’s tartiflette) so I went with the good ol’ duck fat potatoes, as well as some roasted sweet corn and Brussel sprouts.

 What?!? Brussel Sprouts!! No one likes Brussel sprouts!! – I hear you say. And up until a year ago I would have agreed with you, not being able to count on one hand the number of people I knew that admitted they liked them. My dad despised them with as much passion as you could despise a vegetable. He used to tell kids that if you left a Brussel spout on the window sill for a month that it would turn gross and mouldy which was Proof of the noxious poisons within. As such, my childhood was a Brussel sprout-free zone.
 But one grows older and realises that one’s parents are not the be all and end all of culinary experiences. And so I felt brave enough to try when hubby brought them home from the supermarket one day.

 And what do you know, I like them!! I think with most things it is the preparation that makes or breaks it. Brussel spouts are very susceptible to over cooking which will turn them into smelly slimy sludge. A quick dip in boiling water finished off with a knob of butter (or olive oil) is all they need. Or if you’re going to get a bit fancy and try and covert non-BS eaters, you par boil then, the fry up some bacon (or pancetta as I did this time) and fry them in the bacon fat for a bit before popping them in the oven to crisp up – delicious.

 Which brings me to another piece of Worldly Cooking Wisdom; things go better with Pork. There have been many dishes, especially lately which have been improved by the addition of bacon, chorizo, prosciutto or pancetta. It is magic in bolognaise sauces, lasagnes and pasta dishes, great in anything with eggs (like frittatas), even works in some salads, and always smells amazing while cooking. So this is by no means a hard and fast rule, but I do find it works more often than not.

 Pudding was actually a “pouding” – Pouding Chomeur, which I found in a 'Dessert Around the World' Delicious Mag special. It started life as French bread and butter pudding from Canada during the Great Depression (the name literally means “unemployed pudding”). But the main thing that enticed me (apart from cooking another French dish for our Frenchman) was that it contained pecans and maple syrup, which is one of my favorite combinations (I have made a maple-pecan ice cream which is divine). And I knew that dessert-fussy Hubby liked it too.

 So after an fair few hours of preparing and organising I did my traditional table setting; which, as I commented to hubby while deciding between variations on place settings, “If it’s worth doing, it’s worth over doing”.
 
Full lighting

Festive candlelight

 No gingerbread boxes this year, but every place setting did have a little “gift” of a gingerbread tree and stars with a red Lindor ball (all tied up with red ribbon and a sprig of rosemary; totes festive). Throw in a few candles and some ivy with oranges/lemons and dried fruit/nuts and we were set for guests.

  I had decided to do baked camembert again as one of my guests was pregnant last year and wasn't really supposed to eat it (although we all agreed that baking it would probably kills the germs). I used an Australian camembert this year (to have one less trip to a different shopping centre) but prepared it in a similar way to last year (garlic and herbs and red wine O my!)  Interestingly, it turned out a lot thicker with an almost fondue-like consistency, compared to last years’ deliciously oozy cheesy mess”. (apparently it is due to the fat content of the respective cheeses – thanks Mr Frenchman!) It was still super yum.  We also had foie gras, which was brought along by Mr Frenchman and Wife,  as they are much more knowledgeable about these things than I. It is a Christmas day tradition in his family so I thought we could borrow that tradition for ourselves. Plus, Wife of Other Couple has just come back from France and was probably missing French cuisine.

 So again, a fun time was had by all, including all the kids who managed to get to sleep by 10pm. We realized that there was another Ex Pat in our midst – from New Zealand, which means I now get to start researching how to create a Hangi (step one: dig a hole). We did end up with some left overs, which have been turned into a few extra meals and a rather awesome morning tea of baked camembert on toast. Plus a half bottle of champagne (blame those selfish people who switched to red wine with dinner), which is always tricky ingredient to use up . I did remember seeing a Nerdy Nummies Champagne Cupcakes recipe, but that only used half a cup. I have a great recipe (from French Women Don’t get Fat) for Chicken au Champagne (chicken cooked in champagne) but I didn't think it would last the few days it would take until I could cook dinner again. So I settled for the most sensible option…

 I drank it.


 So let’s raise a glass to the sun returning again and to old traditions with new friends.

Tuesday 25 February 2014

Baking it 'til you Make it

 My Hubby jokes that every time I try a new recipe, I always miss one (or three) ingredients. This can be due to the "I'm sure I have enough coriander/pesto/palm sugar etc in the fridge or cupboard" wishful thinking, or just totally misreading the ingredients list. I say this proves what a resourceful and experienced cook I am, in that I can always adjust or adapt to make something that closely resembles what it is supposed to. Hubby says it proves that I do things too fast and don't concentrate enough. He might have something there...
 But I do find that this can be one of the fun parts of cooking. Recipes are all well and good, but there aren't many in my receipe book that haven't had one or tweaks by me after the official First Bake (where I do really try to follow the receipe to the letter). And some people (like my sister-in-law) don't even use receipes at all! (which rather scares me) She calls herself an Instinctive Cook - a bit of this, a bit of that, trying to recreate dishes she's seen. I have had some amazing salads from her, but she is also the first to admit that she isn't a baker. Which makes sense, as there is a lot of Science and Measured Ingredients in baking, and if you gets one thing wrong you can often end up with Sludge. Sometimes delicious Sludge (like my many failed attempts at Chocolate Mousse), but looking nothing like picture.
 And THEN you can have a plan or receipe that you follow to the letter (and even have ALL the ingredients) and it's still not right. Or you decide half way through to change (either by force or choice) and it turns out better than the original plan. It's like the old performing adage: If you keep smiling, no one will know that you've stuffed up (or Fake it til you Make it). So here follows my latest baking adventures - for better or worse.

 The first one was another Nerdy Nummies inspired baked off. She did two "roll cakes", which I think in Australia we would call it a Swiss Roll. But the clever thing was that she baked a design into the cake! A plain one and a chocolate one. So clever, and a little bit fiddly but looked really impressive. So with Valentine's Day coming up (where Hubby and would I both be working, so no chance of a romantic dinner or date night), I thought I would bake something for Work.

 I decided on a chocolate heart cake and so created my own template.


 The decoration batter was mixed and coloured pink, piped in hearts and popped in the freezer.

 I then set about making the actual cake batter; which didn't seem to go quite far enough on my tray (I had decided to make a half batch as I had a smaller tray than Ro). So in the spirit of We Can Fix This, I decided to make another quarter batch of cake to fill the tray.

 I then realised that my cake was a very lovely shade of white. Hmmmm. Must have missed the Adding the Cocoa step. It is the only disadvantage of getting a recipe from a video is that most times there isn't a written step by step instructions. Ro is great as she does have an ingredients list in the information section. What I had done was written down the ingredients (including the 1/4 cup of cocoa) but then followed the Plain Roll Cake instructions and forgot to add the cocoa with the flour. Not to be daunted, I knew there was a way to salvage what was becoming a bit of a cooking disaster: I scraped the entire cake (pink batter and all) into a bowl, added the cocoa and then added the other one-quarter chocolate batter I had made. After re-piping and freezing another load of pink hearts, I added the batter, which seemed to at least fill the tray. A quick burst in the oven and it came out looking really cool....


 Hooray! I fixed it!
(well, apart from forgetting to bang the tray on the bench pre-baking which accounts for the extra air bubbles)

 I rolled the cake up and left it cool over night; rather then adding the cream and strawberries then which would make the cake soggy overnight.

 Valentine's Day morning I unrolled my cake and was a bit dismayed to see that it had cracked; had I left it to cool too long in the rolled up position? Had the run of warm weather we have had in Melbourne lately dried it out too much? It still looked rather cool, and with a few well placed toothpicks, it still did kind of look like a roll.


 Thankfully it tasted yummy and everyone "ooohed" and "aaahed" and "how did you get it looking like that?!?". So that was positive and saved it from what may have been a total disaster.
 However.

 It wasn't what I'd call a total success.

 So with a piping bag still half-full of pink batter, I resolved to try again. I had a family lunch the next day which gave me a chance to be creative and try "freehand" drawing without a template.
 Again, came out of the oven looking really clever.

But AGAIN, it cracked after cooling, even more than the chocolate one! Thankfully again, it held together and still looked really clever.


 And luckily, Family are very forgiving and enjoyed it regardless of the cracking. "Tastes great Mum!" said Son 1 helping himself to his second slice.
  

 So two yummy and cool-ish looking cakes. But it did leave me a bit unfulfilled in that I hadn't got either of these cakes to look as good as Ro's. In mulling over this, I may have had the cake too thick which caused the cracking: for the second cake I made the full cake mix but put it on a tray nearly half the size. So IF I ever try this again, I will ensure that I get the right size tray. It is a cute technique that could easily be adapted to a traditional round cake; kind of "icing" it before it bakes!

 The next Baking Adventure was a birthday cake for me! This was inspired by another You Tube channel that I had been put on to by a baking buddy - My Cupcake Addiction. I may have stumbled across this amazing channel previously but had been scared off by her abundant use of fondant. However in my post-fear-of-fondant baking days, I was very excited by what I saw (I think I even squealed). I had seen her work before; I had Pinned a Christmas wreath cake made out of cupcakes as a potential work Christmas treat. I then saw the Christmas Tree cupcake cake, which led me to all sorts of clever Cupcake Cakes. Its such a simple-but-effective idea (bake cupcakes but ice them to look like a whole cake) and I wondered why I hadn't come across it before! So I decided to  make a Star cupcake cake.

 I used empty cupcake papers to decide how many cakes to bake and duly baked them. As my electric oven is not the worlds greatest, and I baked them in three different tins there were not all beautifully and uniformly rounded as they always look online. No matter - frosting will hide all manner of problems!!


 I had made white chocolate ganache and was going to pipe it onto each cupcake (and fill in the gaps) but quickly realised that Piping used up a lot more ganache than the frosting method! In fact I had only piped half the cupcakes before I ran out: What to do?!? Did I do the mad run to the store to buy more cream to make more ganache that then had to be cooled as quick as possible to allow it to be piped? Or adapt?

 I adapted.

 So it changed from a swirly-piped cake to a ganache-as-frosting cake. It still looked like a whole "cake" which I guess is the idea, and considering how rich the white chocolate ganache is, less was probably a good way to go!


 Next, to make the edges of the star I was going to pipe with left-over red frosting from the Lego block cake, but again it didn't look red enough, especially compared to the red cupcake papers. So I used the frosting to stick the cupcakes to the board, and used the red fondant that I still had in the cupboard from the Marvel cupcakes, which looked much more effective.


 Looking good, but how did it go on a practical level? The kids loved it as they could just pull off a cupcake and eat it (well, lick the icing off the top anyway!). It was a bit weird "cutting the cake" at Happy Birthday tine; I ended up cutting half-way through one cupcake (no touching the bottom with this cake!). But overall - a success.

 So there you go - two examples of Best Laid Plans going astray, which turned out all right in the end. Hooray!


Tuesday 21 January 2014

A Marvel-ous birthday

 One of the great things about being a Foodie, and thus reading lots of recipes/food articles and following blogs and flogs and such, is that you are exposed to sooooo many Cool New Things that fellow cooks, bakers and Domestic Goddesses are whipping up in kitchens around the world. The downside of this is the limited time I have to potter around in MY kitchen to recreate and reinterpret the awesome things I see. So I do end up with quite a long list of  Recipes and Techniques to Try, which I then have to mull over every time I have a dinner or event to cook for, and try and decide which one I am going to try next. Dramas!

 So when I had a chance to combine two or three things recently, it was a bit exciting:  As Hannibal (from the A Team) used to famously say, “I love it when a plan comes together.
 Son 1’s birthday is in January and that means a Kids Party to plan and produce. The Party Boy gets to pick the theme (with veto right from me to ensure I think I can work within said theme) so over the years we have had various Superheroes, Star Wars, cars and such. Never one to have a broad theme, this year we’re having a Lego Marvel Superheroes Party. Yes, it is a party based on a Play Station game where all of the superheroes and villians from the Marvel Comic universe are rendered in Lego (check it out if you're into games, its heaps of fun)

Son 1, being quite a intuitive one, requested the usual party food as well as, “Mum, can you do some cupcakes too?”. Hmm, an opportunity to play with more decorating techniques? Well, as you asked so nicely, of course!! A quick Pintrest search of “Marvel Cupcakes” gave me a host or heroes to choose from, as well as various ways to create an Iron Man mask (though the Nerd in me did get miffed to see them alongside Batman and Superman cupcakes – they are DC Comic not Marvel, people!!). A quick review of the fondant and frosting colours available helped me decide who would make the grade and off we went.

I can't work out how to rotate this pic!!
 For Hulk I used green frosting, the rest had red fondant bases, with black fodant details or yellow and blue frosting, with the ol' faithful black (and white) writing icing for the detail.

 For The Birthday Cake, I was at a bit of a loss. In past years, I have done a Spiderman (see here ) as well as an Iron Man cake, so I was loath to repeat myself. The trusty printed Cake Toppers that have served me so well in past years were no help, as this game was only released 3 months ago and I don’t think the Cake Topper (or party decorations) people had caught up yet. Hubby suggested creating a scene from actual Lego figurines on top of the cake which was a great idea, but I wanted the kids at the party to actually Play with Captain America and Loki and such, so another idea was needed.

 Thankfully Ro at Nerdy Nummies came to the rescue with a cake that was so simple in its execution but looked so fantastic (my kind of cooking!) – a Lego block Cake
  And while I was re-watching how to make a Lego Brick, I was reminded of another cool technique I had seen her use: A Zebra Cake. Kind of like a cooler version of a marble cake, but I thought it was something that might really impress a bunch of 8 year olds.
 Now although I am a huge fan of Ro and her “nerdy themed goodies”, I do despair at her regular use of Box Cakes. I’m sure it an American thing, but I have about 3 or 4 cake recipes that are probably just as quick and easy (and yummier) than a packet mix. So I decided to use one of these. My standard Birthday Cake is a buttermilk cake that I found in Delicious magazine – it was a recipe for Cannoli cupcakes (you use ricotta cheese instead on cream cheese in your frosting), and I found that the cupcakes were nice and solid without being too heavy, and that if you combined the mix in a cake tin, you also got a lovely solid (not too heavy) cake that stayed moist for a day or two. This is very helpful when you are icing cakes over several days (which I often have to do due to work and child-minding time constraints!). To make a chocolate version, I just added 3 TBSP cocoa powder to my flour and off we went.
Chocolate and vanilla ready to go
 As I started alternately pouring the mixes into the prepared pan, I was reminded of how thick a mixture this cake makes; great for cupcakes and cake tins but not so good for mixing together in nice concentric circles.

  Hmmm – might have to find a runnier cake mix for next time. But it did still look zebra-ish as it went into the oven so that boded well.
  The loaf tin did make it take a looooong time to cook; over an hour in the oven, and the edges were getting quite browned, so perhaps runnier mix and round tin for take 2. But was looking good otherwise...
  Onto the decorating!!
  The first difference I noticed between mine and the Nerdy Nummies cake was the colour of the frosting. No matter how much of the colouring I added, I couldn't get it to that nice brick red colour (and I was using the proper cake food colouring). I think the frosting Ro used is bought pre-coloured, which would explain the vivid shade. As I had red fondant, I did toy with the idea of using that instead, but I couldn't get my head around how to cover the marshmallows. So I stuck with my red-but-slightly-dark-pink frosting and hoped that Son 1 wouldn't mind!
 Icing the marshmallows for the brick "bumps" was also a challenge. Ro dipped hers in the frosting, another example of where the pre-bought frosting was easier as it is much runnier than mine (I have used it once on a cake and actually found it quite difficult to work with!). The butter frosting was quite thick and tricky to get onto the marshmallow; I tried holding it on a skewer and covering it but that just ended up gouging out its centre. The technique that I had the most success with was loading up the curved edge with fostering, putting it on the cake and tidying up the top.
It worked pretty well, but I still got a bit of frosting on my fingers. But it still did the job and looked quite impressive.

 The party day arrived and we have five 8 year olds running amok for a few hours, eating fairy bread and such. They were all quite impressed with the cupcakes, arguing over who was going to get which hero. "Happy Birthday" and blowing out the candles all went fine, and so we headed to the Cutting Of the Cake; which did look suitably zebra-ish.

However.

The cake wasn't cooked through.

 I will admit that I wasn't surprised; the cake had fallen in the middle quite a bit when it cooled which is never a good sign. But I basically had a crisp shell surrounding liquid cake - argh!! I think there must have been something wrong with my oven that day as my cupcakes had a few uncooked bits as well and I have made that recipe many times.

Not my finest hour...
 Thanks goodness this Baking Disaster was with a forgiving audience, who went "Wow!!", ate the icing and then went back to playing. I ended up throwing the whole rest of the cake out and feeling like a bit of a Domestic Duffer for the rest of the afternoon. Thankfully Son 1 didn't care as he got to have one of the Deadpool cupcakes ("My favourite, mum!").

 But I will not let this beat me. Obviously the buttermilk cake is not a good option for the zebra cake technique, and definitely not a loaf tin. I think the next time I try will be in a round tin, and using a chocolate mud cake recipe which I know is runny mixture; I will just have to check that my white chocolate recipe is of a similar cooking time.

Or maybe I'll just use a packet mix...